Coping Skills Master List Calm Connection Guide
Your personal toolbox for finding peace and support.
Name: ____________________________
Date: _____________________________
What are Coping Skills?
Coping skills are tools we use to manage difficult emotions like sadness, worry, or frustration. Just like an athlete uses different moves for different plays, you can use different skills depending on how you feel.
Reaching Out
Talk to a Trusted Adult: Find a teacher, counselor, or family member.The "Help" Signal: Use a pre-arranged signal (like a card or emoji) if talking is hard.Connect with a Peer: Sit with a friend or send a kind text.
Inside Balance
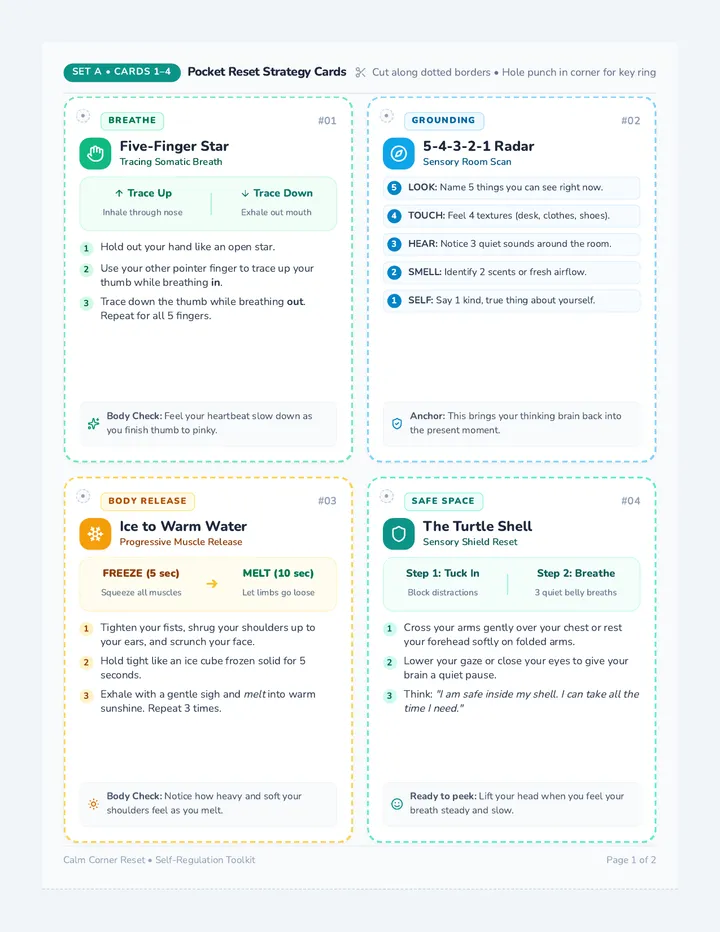
Deep Breathing: Try box breathing (4 in, 4 hold, 4 out, 4 hold).5-4-3-2-1 Grounding: Name 5 things you see, 4 you feel, 3 you hear, etc.Thought Check: Ask yourself, "Is this thought 100% true right now?"
Creative Release
Journaling: Write down your "brain dump" or follow a prompt.Art Expression: Draw your "weather" (how you feel) or use colors.Music: Listen to a specific "calm down" or "feel good" playlist.
Daily Rhythm
Stick to Routine: Keep your meal and sleep times consistent.Small Wins: Check off one simple task (like making the bed).Physical Movement: Go for a 5-minute walk or do a quick stretch.
My Top 3 Go-To Skills:
Safety Net Slides Safety Net
Building Your Support System
Calm Connection: Session 1
Weather Check-In
How is the "climate" in your head right now?
Sunny
Feeling calm, happy, or steady.
Partly Cloudy
A little distracted or "meh."
Rainy
Feeling sad, tired, or low energy.
Stormy
Feeling anxious, angry, or overwhelmed.
What is a Safety Net?
Connection
The people who catch you when you're falling or feeling low.
Stability
Knowing you don't have to solve everything on your own.
Seeking Support (Your Way)
Speaking Up
• "I'm having a hard time today."
• "Can we talk for a few minutes?"
• "I need a distraction. Can you tell me a story?"
Quiet Signals
• Sending an email or text.
• Using a "Help" card or sticky note.
• Handing a journal entry to an adult.
Activity: We'll identify your "Circle of Support" on your worksheet next.
Circle of Support Worksheet Circle of Support
Mapping your personal safety net.
Name:
Date:
A Safety Net isn't just one person—it's a group of people you can turn to for different things. Some are for big problems, some are for a quick laugh, and some are just for feeling safe.
Peers & Community
School & Home Adults
My Inner Circle
ME
Who makes me laugh?
Who listens best?
Who is safe?
Who is at school?
My "Help" Plan
If I feel overwhelmed, I will approach:
My preferred "Quiet Signal" is:
Sending an email
Leaving a sticky note
A specific hand gesture
I can say (or write):
Write a script here or a message you could send...
Safety Net Script Safety Net Script
Lesson 1 Facilitator Guide • 30 Minutes
Focus Skills
Support Network • Seeking Help
Materials Needed
• Safety Net Slides
• Circle of Support Worksheet
• Coping Skills Master List
Student Context
Quiet student; focus on providing wait time and validating non-verbal communication methods.
Key Objective
Identify 3+ support people and select 1 preferred "Quiet Signal" for help.
0-5 MIN
Welcome & Weather Check
Slide 1-2: Start with a warm, low-pressure welcome. Allow the student to point to their "Weather" if they aren't ready to speak.
"Hi! I'm so glad we're starting this 'Calm Connection' series together. Today is about making sure you have a 'Safety Net.' Before we dive in, look at these weather icons on the screen. Which one matches how you're feeling right now? You can just point or tell me."
Counselor Note: If the student picks 'Rainy' or 'Stormy,' briefly validate: "I appreciate you being honest about that. It's okay to start the session feeling that way."
5-15 MIN
Defining the Safety Net
Slide 3: Explain the concept of the safety net. Use the visual anchor of a shield or net.
"A safety net is what catches us when we feel like we're falling. In real life, it’s the people who support us. It’s hard to carry everything alone, and you don't have to."
Slide 4: Introduce "Quiet Signals." This is crucial for quiet students.
"Sometimes, the hardest part of feeling low is having to talk about it. Did you know you don't always have to use your voice? You can use a signal—like a sticky note, an email, or even a specific emoji—to let someone know you need a check-in."
15-25 MIN
Circle of Support Activity
Worksheet: Hand the student the Circle of Support Worksheet . Use the 'Master List' as a reference.
"Let's fill this out together. In the center is you. In that first circle, who are the 1 or 2 people you feel safest with? It could be a parent, a sibling, or even a pet to start. As we move out, let's think about school adults who can help if you're feeling anxious during class."
The "Help" Plan: Focus on the bottom half of the worksheet.
"Look at the 'Quiet Signals' section. Which one of those feels the most 'you'? If you were sitting in math and felt really overwhelmed, which signal would be the easiest for you to use?"
25-30 MIN
Ink and Insight Script Ink and Insight Script
Lesson 2 Facilitator Guide • 30 Minutes
Focus Skills
Self-Reflection • Journaling Techniques
Materials Needed
• Ink and Insight Slides
• Pen to Paper Guide
• Coping Skills Master List
• Writing Utensils (Pens, Markers)
Facilitator Stance
Modeling vulnerability and "low-stakes" sharing. Emphasize that there is no "right way" to journal.
Key Objective
Identify one journaling style the student finds helpful and complete a 5-minute initial entry.
0-5 MIN
Welcome & Signal Check
Slide 1-2: Start with a check-in. Refer back to Lesson 1's "Quiet Signals."
"Welcome back! Since we last met, did you notice any times you used your 'Quiet Signal' or your 'Safety Net'? No worries if not—we're still just practicing. Today, we're looking at a tool that doesn't involve anyone else: Journaling. Sometimes, the thoughts in our heads get too loud, and putting them on paper helps turn the volume down."
5-12 MIN
The Power of the Pen
Slide 3-4: Discuss the benefits. Use the "Brain Storage" metaphor.
"Your brain is like a computer with too many tabs open. Journaling is like closing the tabs you don't need right now. It helps us see patterns in how we feel and gives us a safe place to say things we aren't ready to speak out loud yet."
Counselor Note: For a quiet student, emphasize that this is 100% private. They don't have to show you what they write unless they want to.
12-25 MIN
The "Pen to Paper" Practice
Slide 5-6 / Guide: Hand out the Pen to Paper Guide . Walk through the three styles.
"There are three ways we can try this. One is a 'Brain Dump'—just write everything messy and fast. Another is 'Sentence Starters' for when you're stuck. And the third is 'Gratitude,' finding small wins. Which one of these looks the least 'boring' or 'difficult' to you right now?"
Activity: Set a timer for 5 minutes. Facilitator should also journal to model the behavior.
"I'm going to journal with you. We'll just write for 5 minutes. You can draw, doodle, or write single words if that's easier than sentences. Starting... now."
25-30 MIN
Closing Reflection
Slide 7: Acknowledge the effort. Don't force them to share the content.
"How did that feel? You don't have to tell me what you wrote, but did your hand feel tired, or did your brain feel a little lighter? For next time, try to do just one 'Brain Dump' or 'Gratitude' list if you feel a 'cloudy' day coming on. Next time, we're going to get even more creative with some art-based coping!"
Ink and Insight Slides Ink & Insight
Your Voice, Your Page, Your Peace
Calm Connection: Session 2
Why Journal?
"The paper is more patient than people."
— Anne Frank
Choose Your Style
The Brain Dump
Write everything you're thinking as fast as you can. No grammar, no rules. Just get it out.
Rose & Thorn
Rose: One good thing.
The Secret Letter
Write a letter to yourself, a feeling, or someone else that you never intend to send.
"I don't know what to write..."
That's okay! We'll use the Pen to Paper Guide to find your flow. Remember: there are no wrong words in your journal.
Start Small
Be Honest
Keep Going
Pen to Paper Guide Pen to Paper
A Guide to Effective Journaling
Student Resource
Why Journal?
"Journaling isn't about being a great writer. It's about being honest with yourself. When your thoughts are stuck in your head, they feel heavy. When you put them on paper, they have a place to stay."
Quick Tips for Success:
Date your entries: This helps you see how you grow over time.Forget about spelling: Your journal is for you, not a teacher.Try "Timed Writing": Set a timer for 5 minutes and don't stop.
What to Write?
If you're feeling Sad:
"If my sadness was a color, it would be... because..." or "I feel most alone when..."
If you're feeling Anxious:
"My brain is telling me... but the truth is..." or "What are three things I can control right now?"
If you're feeling Numb/Quiet:
"What do I hear in the room right now?" or "I don't have words today, so I'm drawing..."
My First Brain Dump
Use this space to write anything—random words, song lyrics, how the chair feels, or a big worry. No stopping!
Stuck? Start with "I don't know what to say today..." and see where the pen goes.
Session 2 of 4
Journaling Pulse Check Journaling Pulse Check
Session 2 Progress Monitor • Counselor & Student Copy
Current Phase
Skill Acquisition: Journaling
Student Review
How did the "Brain Dump" feel today?
Too Much
1
2
3
4
5
Just Right
Which style felt most like "you"?
Brain Dump
Gratitude
Quick List
What made it hard to start?
Nothing to say
Afraid someone reads it
Hard to pick words
Too tired
Session Goal
I will try to do one 5-minute journal entry before our next session when I feel...
Facilitator Notes
Engagement Level
Resistance I · II · III · IV · V Enthusiasm
Prompting Required
Minimal (Independent)
1-2 verbal prompts
Heavy scaffolding/modeling
Observed Affect
Note non-verbal cues (pacing, sighing, focus, eye contact change)...
Next Session Focus
Transition to Art-based Coping?
Total Time
30 Minutes
Skill Mastery
Introduction
Participation
________________
Creative Calm Script Creative Calm Script
Lesson 3 Facilitator Guide • 30 Minutes
Focus Skills
Non-Verbal Expression • Emotional Regulation
Materials Needed
• Creative Calm Slides
• Artful Expressions Activity
• Colored Pencils/Markers
• Calm Background Music
Artistic Approach
Process over Product. Emphasize that "skill" doesn't matter; the "feeling" of the color and line does.
Key Objective
Map at least three different emotions using non-representational art (colors/shapes).
0-5 MIN
Welcome & Journal Recap
Slide 1-2: Check-in using a "Color" instead of words.
"Welcome back! Last time, we talked about using words to clear our heads. Today, we're taking it one step further. Sometimes, even words are too much. Look at these colors on the screen—if your mood today was a color, which one would it be? You can just point to one."
5-10 MIN
Beyond Words
Slide 3-4: Explain why art works for the brain.
"When we're stressed, the 'thinking' part of our brain can get overwhelmed. The 'creative' part of our brain doesn't use words, so it can sometimes speak for us when we're tired or quiet. We're going to use colors and lines to 'talk' today."
10-25 MIN
Artful Expressions
Activity: Hand out the Artful Expressions Activity . Put on soft music.
"Look at these circles on your page. I want you to pick a color for 'Calm.' Now, fill that circle however you want—dots, swirls, or just a solid color. There's no wrong way to do it. Now, let's try 'Worry.' What does that look like? Is it jagged lines? Dark colors?"
Counselor Note: Sit and create alongside the student. If they seem stuck, say: "I'm going to make my 'Calm' look like blue wavy lines. You don't have to copy me, but you can if you're not sure where to start."
25-30 MIN
Closing Perspective
"You made some really powerful things today. This is another tool in your kit. If you're at home and feel that 'jagged line' feeling, maybe you can grab a pencil and just scribble it out on a piece of paper. Next week is our final session—we're going to build your official 'Coping Toolbox' and talk about how to keep these skills going."
Support for the Quiet Student:
Provide an "Emotion Color Key" if they struggle to choose. Avoid asking "What does this mean?" Instead, use observing statements: "I notice you used a lot of red and sharp lines in that circle. It looks like it took a lot of energy to draw."
Creative Calm Slides Creative Calm
When Words Aren't Enough
Calm Connection: Session 3
It's Not "Good" Art
The goal isn't to make a masterpiece. The goal is to get the feeling out of your body and onto the paper.
Process > Product
How it feels to draw is more important than how it looks.
No Mistakes
A "mistake" is just a new direction for your lines.
Try These Methods
Mood Colors
Don't draw things. Just choose colors that match your feelings and fill the page.
Doodle-Flow
Draw repetitive patterns (lines, dots, circles) until the page is full. Very calming!
Feeling Shapes
Draw your emotion as a shape. Is it sharp? Round? Heavy? Floating?
Art is Silent Talk
Sometimes we can't find the words to say "I'm sad" or "I'm scared." Art lets us say those things without making a sound.
Let's try it together.
Artful Expressions Activity Artful Expressions
Visualizing feelings through color and shape.
Session 3: Creative Calm
Today's Prompt
Choose a feeling you've had this week. Without using any words or drawing actual people/objects, fill the frames below. Focus on the colors that match the feeling and the types of lines (jagged, smooth, swirling) that describe it.
Frame A: The Feeling Inside
Try using colors that feel "heavy" or "light."
Frame B: The Feeling Releasing
Imagine the feeling leaving your body as you draw.
Looking Back
One word to describe my art today:
How did my body feel while I was drawing? (Relaxed, tense, focused...)
Toolbox Tracker Script Toolbox Tracker Script
Lesson 4 Facilitator Guide • 30 Minutes
Focus Skills
Skill Synthesis • Future Planning
Materials Needed
• Toolbox Tracker Slides
• Daily Calm Tracker
• Session Check In Log
• Student's previous work
Final Stance
Empowerment. Transition from "learning new things" to "owning the tools."
Key Objective
Select 3 go-to skills and establish a weekly tracking routine.
0-5 MIN
Welcome & Full Kit Check
Slide 1-2: Celebrate the journey so far.
"Welcome to our final 'Calm Connection' session! Think about everything we've looked at: your Safety Net, your Journal, and your Creative Calm. Which one of those felt like it fit you the best? Today is about making sure those tools don't just stay in this room—they go with you everywhere."
5-10 MIN
The Power of Choice
Slide 3-4: Discuss why we track progress.
"When we're feeling low, it's easy to forget we have tools. That's why we use a tracker. It's like a map that shows us where we've been and reminds us what works. It helps us see that even on 'stormy' days, we can still do something to feel a little more steady."
10-25 MIN
Building the Habit
Activity: Hand out the Daily Calm Tracker .
"Look at this tracker. Every day, you just mark how you're feeling and if you used a skill. Let's fill out 'Monday' as if it was today. What was your mood this morning? Which skill did we practice today? It takes less than a minute, but it makes a big difference."
Check-In Log: Explain how you will keep in touch.
"We'll use this Session Check In Log when we meet from now on. It’s our way of seeing your successes. Look—I already have '4 out of 5 successes' written here because of how well you've engaged with these tools!"
25-30 MIN
Closing & Confidence
"You've worked so hard. You have a team (Safety Net), a voice (Journaling), and a way to express yourself (Art). Keep your folder in a safe place. Remember, it's okay to have bad days—now you just have a better way to handle them. I'm so proud of the work you've done."
Future Support Strategy:
Establish a "Check-in Spot" or time for the student to drop off their tracker or send a 'Quiet Signal' email once a week to maintain connection without the pressure of full sessions if they are progressing toward independence.
Daily Calm Tracker Daily Calm Tracker
Building my independent coping toolbox.
Weekly Goal
4 / 5
Successes
My Self-Report
Week of: ________________
Day How I Felt (1-5) Skill I Used Did it help? Prompts Needed? Mon
|
Yes No
| 0 / 1 / 2+ |
| Tue |
|
|
YesNo
| 0 / 1 / 2+ |
| Wed |
|
|
YesNo
| 0 / 1 / 2+ |
| Thu |
|
|
YesNo
| 0 / 1 / 2+ |
| Fri |
|
|
YesNo
| 0 / 1 / 2+ |
Staff Observation
Observer Name
Notes on Independence
Parent Input
Did the student use any skills at home this week?
Often
Sometimes
Not yet
Family Comments
Toolbox Tracker Slides Toolbox Tracker
Commitment & Progress
Calm Connection: Session 4
Our Goal
"Independently use a coping skill in 4 out of 5 opportunities."
This doesn't mean being perfect. It means choosing a tool from your toolbox when things get tough.
Monday
Tuesday
Wednesday
Thursday
How to Use Your Tracker
01
Check In
Rate your mood (1-5) once a day.
02
Pick a Tool
Choose from your Master List if you feel low.
03
Log It
Write down what you did on your sheet.
04
Celebrate
Every time you use a tool, you're winning.
You've Got This
Whether it's drawing, writing, or asking for a quiet moment, you have the power to help yourself feel better.
Independence is your superpower.
Session Check In Log Session Success Log
In-session data and reflection for Goal Progress.
Student: __________________
Counselor: ________________
Session #
_____
Date
____/____/____
Goal Status
4/5 Independent Successes
How are we starting today?
😔
Low
😐
Neutral
🙂
Steady
Energy Level:
Review: Since last session...
Reviewing 5 Opportunities
What was happening?
Skill Used
Independence Level
1
Indep.
1 Prompt
2+ Prompt
2
3
4
5
Session Reflection
One thing that worked well:
One thing to try next week:
Counselor Data Notes
Record specific prompt types (verbal, visual, physical) used during session check-in.