Blender Basics Lesson Plan Blender Basics: 3D
Lesson Plan
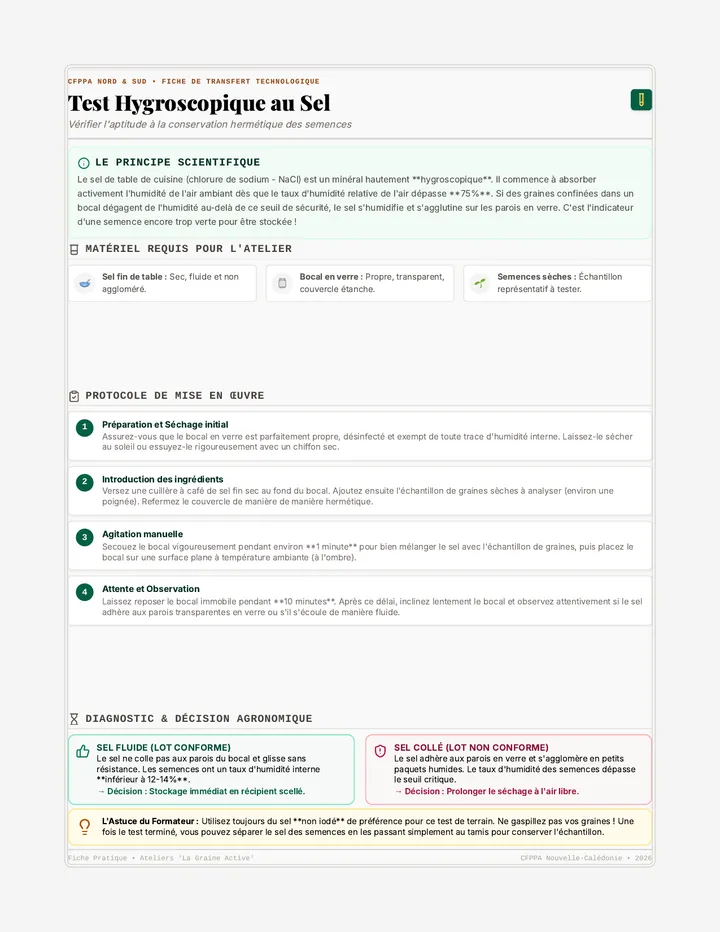
Duration
100 Minutes
Objective
Students will learn the basic interface, navigation, and fundamental modeling tools in Blender to create simple 3D objects, laying the groundwork for more advanced 3D design projects.
Audience
College Seniors
Tier 1 Instruction
Why This Matters
Understanding 3D modeling is a critical skill in today's digital landscape, applicable in fields like game design, animation, product visualization, and architecture. This lesson provides a foundational understanding, opening doors to diverse career opportunities and creative expression.
Preparation
Ensure all student computers have Blender 3.0 or higher installed.
Review the Blender Quick Start Guide for software-specific tips.
Prepare the Blender Basics Slide Deck and script.
Test projector and computer setup for live demonstrations.
Print or digitally prepare the Simple Model Challenge and Cool Down .
Materials Needed
Blender Software
Computers w/ Internet
Blender Basics Slide Deck
Blender Script
Quick Start Guide
Simple Model Challenge
Instructional Sequence
10 MIN
Introduction & Warm-Up
Brief discussion: "What is 3D modeling? Where do we see it in the real world?"
Introduce Blender and its capabilities as a free, open-source industry standard.
Teacher Note: Refer to the Script for guided discussion points and opening remarks.
20 MIN
Blender Interface & Navigation
Guide students through the interface using the Slide Deck: 3D Viewport, Outliner, Properties Editor.
Demonstrate and practice navigation: Orbit (MMB), Pan (Shift+MMB), Zoom (Scroll).
Teacher Note: Emphasize keyboard shortcuts early to build efficient habits.
25 MIN
Basic Object Creation & Transformation
Demonstrate creating primitive objects (Cube, Sphere, Cylinder) using Shift+A.
Explain and demonstrate the "Holy Trinity" of transformations: Grab (G), Rotate (R), Scale (S).
Hands-on practice: Students create multiple primitives and transform them across axes.
30 MIN
Edit Mode & Basic Modeling
Introduce Edit Mode (Tab) : Explain Vertices, Edges, and Faces.
Demonstrate essential tools: Extrude (E) , Loop Cut (Ctrl+R) , and Bevel (Ctrl+B) .
Guided Practice: Build a simple object (table or house) step-by-step.
Teacher Note: Circulate to provide individual support during the build.
15 MIN
Simple Model Challenge & Wrap-up
Launch the Simple Model Challenge (10 mins): Create a chair, cup, or building.
Conclude with Q&A and the Reflection Cool Down (5 mins).
Teacher Note: Assign the remainder of the challenge as optional homework if students want to polish their models.
Blender Basics: 3D modeling fundamentals Tier 1 Classroom Instruction
Blender Basics Slides Welcome to 3D Modeling
What is 3D Modeling?
• Creating three-dimensional representations of digital objects.
• Used in movies, games, architecture, and product design.
Why Blender?
• Free and Open Source.
• Industry-Standard Power.
• Gateway to endless creativity!
The Blender Interface
Navigation 101
3D Viewport
Your main workspace where you see and manipulate objects.
Outliner List of all scene objects
Properties Settings for selected items
Toolbar Modeling and sculpting tools
Movement Controls
Orbit MMB
Pan Shift + MMB
Zoom Scroll MMB
Creating & Transforming
G
Grab
Move Object
R
Rotate
Turn Object
S
Scale
Size Object
Adding Primitives
Press Shift + A to add Meshes
"Pro-tip: After pressing G, R, or S, tap X, Y, or Z to lock transformation to an axis!"
TAB
Enter Edit Mode
The Components
1
Vertices
2
Edges
3
Faces
Essential Tools
Extrude E
Loop Cut Ctrl + R
Bevel Ctrl + B
The Challenge
Your first 3D model
A Table
A Mug
A House
Remember: Creation + Transformation + Edit Mode
Blender Basics Script Blender Basics: 3D Script
Instructional Facilitation Guide
10 MIN
Warm-Up & Introduction
"Good morning/afternoon, everyone! Welcome to our session on 3D modeling using Blender. Has anyone here ever tried 3D modeling before? Or perhaps you've seen 3D models in movies, video games, or even in product advertisements? What comes to mind when you hear '3D modeling'?"
"That's right! 3D modeling is all about creating three-dimensional representations of objects. It's a powerful skill used across so many industries, from making the characters in your favorite animated movies to designing buildings and even medical devices. Today, we're going to dive into Blender, a free and open-source software that's incredibly powerful and widely used in the industry. It's a fantastic tool to kickstart your journey into 3D creation."
20 MIN
Blender Interface & Navigation
"Let's get comfortable with Blender's interface. When you first open Blender, you'll see a default cube, a camera, and a light source. The large central area is our 3D Viewport – this is where all the magic happens! On the right, you'll see the Outliner , which lists everything in your scene. Below that is the Properties Editor , where you can adjust detailed settings for anything you select."
"Now, for navigating our 3D world. This is crucial! To orbit around your object, press and hold the Middle Mouse Button (MMB) and drag. To pan (move the view side to side), hold Shift + MMB and drag. To zoom , simply scroll your MMB ."
Pause here for 5 minutes. Circulate and ensure everyone can successfully orbit and zoom.
25 MIN
Basic Object Creation & Transformation
"Great job with navigation! Now, let's bring some new objects into our scene. We can add basic shapes, called 'primitives'. Go up to the Add menu at the top, then Mesh, and select Cube. You can also use the shortcut Shift + A to bring up the Add menu right where your mouse is."
"Once you have an object selected, we can transform it using the 'Holy Trinity' of Blender keys: G for Grab, R for Rotate, and S for Scale. Try pressing a key and then tapping X, Y, or Z to lock the move to that axis. Click to confirm your change."
30 MIN
Edit Mode & Basic Modeling
"So far, we've been working with entire objects. But what if we want to change the shape more precisely? Press the Tab key. This is . Notice the dots (Vertices), lines (Edges), and surfaces (Faces)."
Blender Quick Start Guide Reference Blender Quick Start
Shortcut & Navigation Reference
1. Navigation
Orbit View MMB
Pan View Shift + MMB
Zoom In/Out Scroll MMB
2. Interface Areas
3D Viewport: Main interaction window.
Toolbar: Tools on the left (G, R, S).
Outliner: List of all scene objects (top right).
Properties: Object settings (bottom right).
Selection Tip
Press 1, 2, or 3 (top row keys) in Edit Mode to switch between Vertex, Edge, and Face selection.
3. Object Interaction
Add Mesh Shift + A
Move (Grab) G
Rotate R
Scale S
Delete X
4. Modeling (Edit Mode)
Switch Modes Tab
Extrude E
Loop Cut Ctrl + R
Bevel Ctrl + B
Axis Locking
Press G, R, or S and then X, Y, or Z to limit movement to one direction.
Blender 3.0+ Interface Guide • keep on your desk
Simple Model Challenge Activity Simple Model Challenge
Build Your First 3D Object
Name:
Date:
Goal
Use the Blender tools you learned today to create a simple 3D object. Experiment and bring a basic idea to life!
Step 1: Choose Your Project
OPTION A
The Table
Start with a cube tabletop
Extrude (E) the legs
Add Loop Cuts for detail
OPTION B
The Mug
Start with a cylinder
Extrude (E) for rim/depth
Extrude handle shape
OPTION C
The House
Start with a cube base
Extrude walls/roof
Loop cut windows/doors
Step 2: Use Your Toolbox
G / R / S
Tab (Edit)
E (Extrude)
Ctrl+R (Loop)
Step 3: Reflection
What was the most challenging part of this activity?
What was the most satisfying part of seeing your object take shape?
How do you think these modeling skills could be applied in your future career?
Blender Basics Cool Down Exit Ticket Cool Down
Session Reflection
1
One Big Idea
What is one key concept or tool in Blender that you found most interesting or useful today?
2
Aha! Moment
Was there anything that clicked for you, or something you understood better after practicing?
3
Future Fun
How might you use Blender in the future, for a personal project or professional life?
Name: ______________________ Blender Basics: 3D