Web Foundations Slides Digital Literacy // Web Design
WEB FOUNDATIONS
DNS, Hosting Architecture, and the Physical Web.
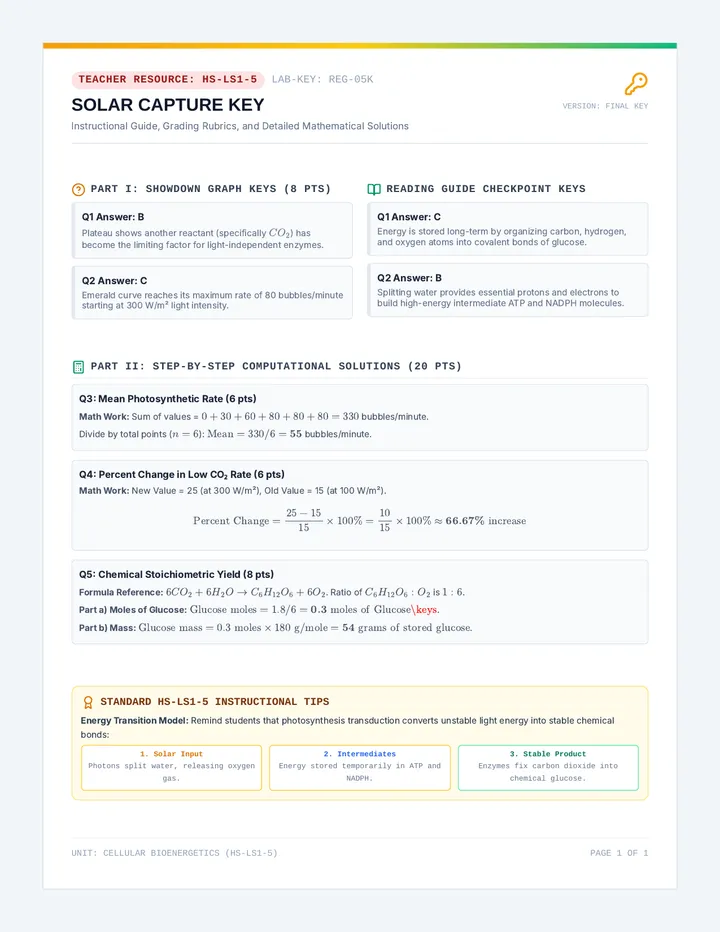
L1: INFRASTRUCTURE
The Journey of a Packet
01 // Connectivity
Request
You type example.com into your browser.
DNS Lookup
The browser asks a DNS server: "What is the IP address for this domain?"
Data Exchange
Your computer connects to the server IP and downloads the site files.
Physical Reality
"The 'cloud' is just someone else's computer in a high-security warehouse with massive cooling units and fiber optic connections."
Tracing route to 93.184.216.34 [example.com] over a maximum of 30 hops...
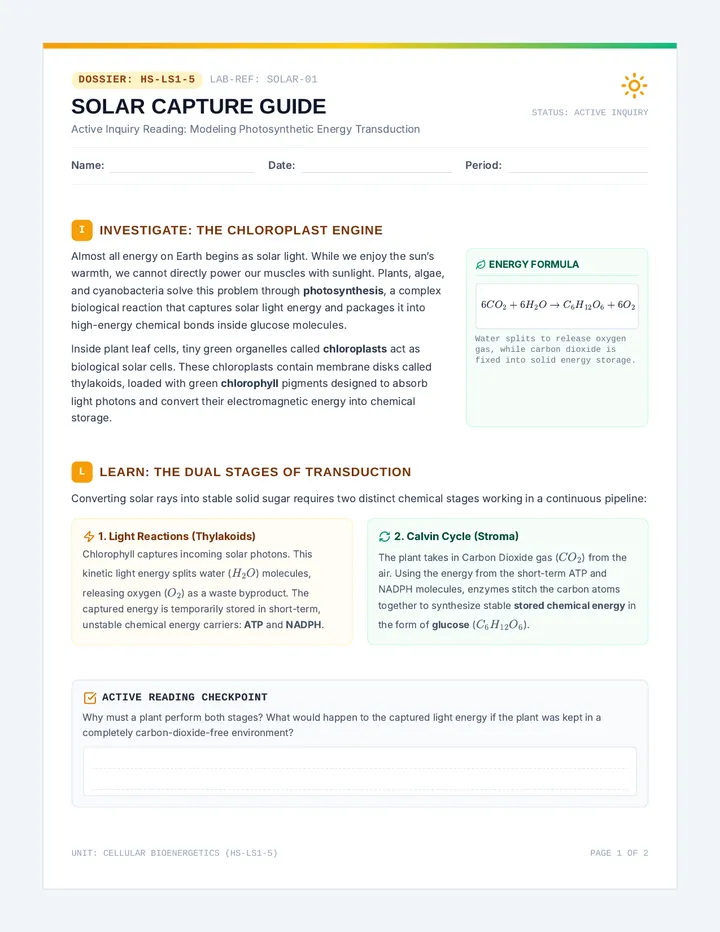
Domain Name System (DNS)
02 // Navigation
1
A-Record
IP Pointer
Maps your domain directly to an IPv4 address (e.g., 192.0.2.1).
2
CNAME
The Alias
Points one domain name to another name, not an IP. Good for subdomains.
3
MX Records
Mail Exchange
Specifies the mail servers responsible for receiving email on your domain.
The Propagation Lag
DNS changes aren't instant. It can take up to 48 hours for servers worldwide to update their "phonebook" records.
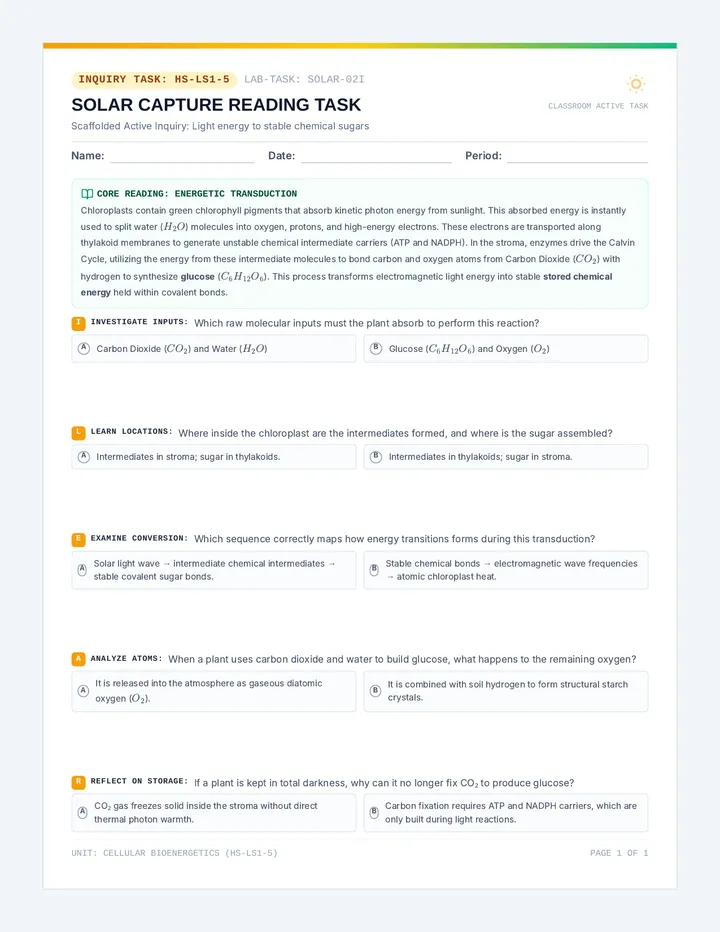
Hosting Architectures
03 // Storage
Type Analogy Best For Cost Shared Hosting An Apartment Building Small blogs, personal sites $ VPS (Virtual Private) A Townhouse / Condo Growing businesses, app devs $$ Dedicated Server Private Mansion High traffic, huge security needs $$$$ Cloud Hosting Utility (Electricity/Water) Scalable apps, erratic traffic Pay as you go
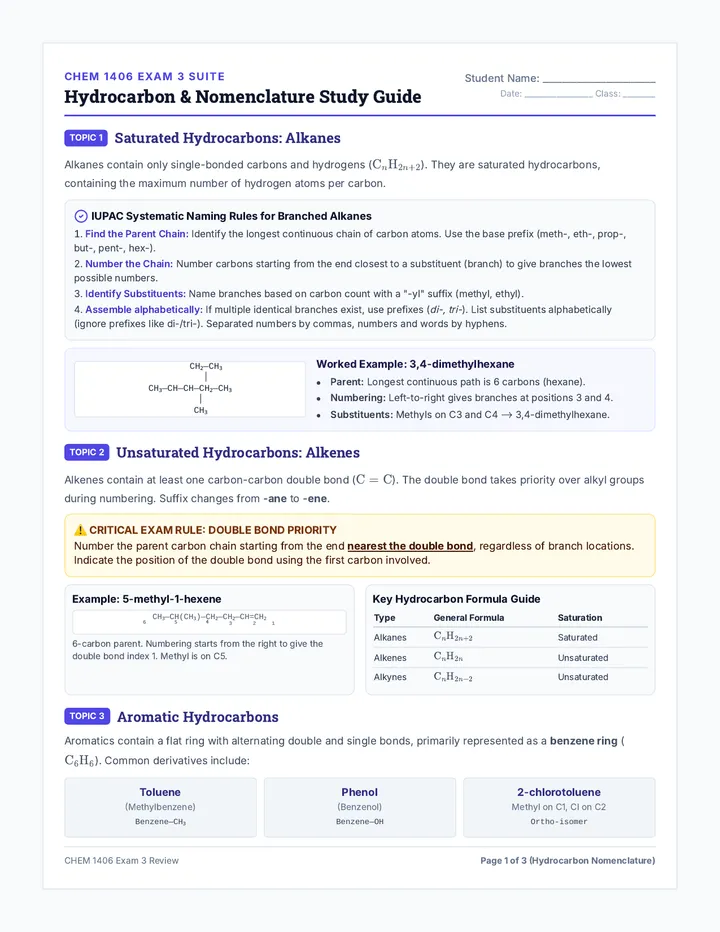
WHERE IS YOUR DATA?
If you host your site on a server in London, but your users are in New York, what physical barriers exist? How does this impact "User Experience" (UX)?
Latency
Jurisdiction
Environment
Web Foundations Teacher Guide Teacher Guide: Web Foundations
Lesson 1 // Understanding DNS & Web Hosting Architecture
Ref: L1-INFRA-TG
Lesson Overview
This lesson demystifies the physical and logical layers of the internet. Students will move beyond "the cloud" as a nebulous concept to understand it as a network of physical servers managed by DNS. This foundational knowledge is critical for troubleshooting deployment issues later in the sequence.
Learning Objectives
Explain the DNS lookup process in plain English.
Distinguish between A-Records, CNAMEs, and MX Records.
Evaluate the pros/cons of shared vs. cloud hosting for specific use cases.
Identify how server location impacts site performance (latency).
Preparation & Materials
Slides: "Web Foundations Slides" ready for presentation.
Activity: "DNS Packet Trace Activity" (1 per student).
Tools: Access to a terminal (macOS/Linux) or Command Prompt (Windows).
Key Vocabulary
DNS, IP Address (IPv4/v6), Nameserver, Registrar, Propagation, Latency, Bandwidth, Shared vs. Dedicated.
Instructional Workflow
00-10 Min
The Hook: Traceroute Live
Ask students: "Where exactly is the file for your favorite website?" Open a terminal and run traceroute google.com (or tracert on Windows). Explain that each "hop" is a physical router or server the request passes through.
Discussion Prompt: "Why are some hops slower than others? Does the distance of the hop matter?"
10-30 Min
The Phonebook (DNS)
Use the Web Foundations Slides . Focus on the DNS lookup cycle. Use the "Apartment Building" analogy for hosting:
• Registrar: The City Planning Office (where you register the address).
• DNS: The GPS/Maps App (how people find the address).
• Hosting: The physical plot of land and building.
30-50 Min
Skill-Building: DNS Records Workshop
Hand out the DNS Packet Trace Activity . Students will simulate being a DNS server, resolving requests and deciding which hosting architecture fits different business scenarios.
50-60 Min
Debrief & Prep
Discuss "Propagation." Ask: "If I change my hosting today, why can't my grandma in Florida see the new site until tomorrow?" Explain the role of TTL (Time To Live).
Expert Facilitation Tips
Common Misconceptions
DNS Packet Trace Activity DNS Packet Trace
Mapping the Invisible Paths of the Web
NAME: ___________________________
DATE: ___________________________
PART 01 // RECORD RESOLUTION
You are a DNS Server. Below are three requests from users. Look at your Zone File (Reference) and provide the correct response.
Zone File Reference: example-project.org
Name
Type
Value
@ (Root)
A
192.168.1.101
www
CNAME
example-project.org
mail
MX
mx1.google-mail.com
dev-site
A
192.168.1.205
Request: www.example-project.org
Request: dev-site.example-project.org
Request: Routing an Email
PART 02 // HOSTING BLUEPRINTS
Read the client scenario below and recommend a hosting type (Shared, VPS, Dedicated, or Cloud). Explain why .
Client: "FlashSale Apparel"
"We are a startup launching a new clothing line. Most of the year, our traffic is low. However, once a month we drop a limited-edition collection promoted by influencers. For 2 hours, our traffic spikes from 10 users to 50,000 users. Last time, our site crashed."
Recommendation:
Justification (How does this architecture handle the "spike"?):
The "Traceroute" Bonus
Use your laptop to run a traceroute to wikipedia.org. How many "hops" does it take to reach the server? What is the highest latency (ms) you see on a single hop?
File Sync Slides Digital Literacy // Web Design
FILE SYNC SYSTEMS
Mastering FTP, Versioning, and Deployment Workflows.
L2: DEPLOYMENT
File Transfer Protocol (FTP)
01 // Transport
The "Postman" of the Web
FTP is the standard protocol for moving files from your local computer to the web server's storage.
Local ➔ Remote Upload
Remote ➔ Local Download
SFTP (Secure) is Required
What You Need to Connect:
Host ftp.example.com
Username web_admin_24
Password ••••••••••••
Port 21 (FTP) or 22 (SFTP)
Status: Connected to Server...
Why Version Control?
02 // Safety
The Disaster
You and a teammate both edit index.html at the same time. You upload yours, but then they upload theirs and overwrite all your work.
The Solution
Git and other Version Control Systems (VCS) track every single character change. You can travel back in time to any previous version.
The Workflow
1. Commit (Save snapshot)
2. Push (Send to cloud)
3. Pull (Get team updates)
4. Merge (Combine work)
The Deployment Golden Rules
03 // Professionalism
Never Edit "Live"
Editing files directly on the server via the hosting file manager is a recipe for a broken site. Always develop locally first.
Staging vs. Production
Upload to a "Staging" URL (e.g., test.mysite.com) to check for bugs before pushing to the real site.
Sync Everything
Ensure your Local environment exactly matches the Server's PHP/Database versions to avoid "It works on my machine" syndrome.
File Sync Teacher Guide Teacher Guide: File Sync Systems
Lesson 2 // FTP and Deployment Workflows
Ref: L2-DEPLOY-TG
Lesson Overview
In this lesson, students transition from building sites locally to understanding how professional developers move those files to the internet safely. We introduce the core tools of the trade: FTP Clients (like FileZilla or Cyberduck) and the fundamental mindset of Version Control (Git).
Learning Objectives
Configure an FTP client with Host, Username, Password, and Port.
Explain the difference between local and remote directories.
Articulate the danger of "conflicting changes" in team environments.
Understand the "Commit/Push/Pull" cycle of version control.
Preparation & Materials
Software: Install an FTP client (FileZilla recommended) on lab computers.
Worksheet: "FTP Survival Worksheet" (1 per student).
Server Info: Provide students with dummy FTP credentials (if a live server is available) or use the simulation on the worksheet.
Instructional Workflow
00-10 Min
The Hook: The Overwrite Disaster
Split the class into pairs. Give them a piece of paper (the "Site"). Student A writes a header. Student B then takes the paper and writes a footer. Now, tell Student A they decided to change the header, so they take a new blank paper, write the new header, and throw away the old paper. Point out that Student B's work is now gone.
Core takeaway: Without a system, we are just overwriting each other's hard work.
10-35 Min
FTP Interface Mastery
Using the File Sync Slides , walk through the FileZilla interface.
• Left Pane: "Your House" (Local)
• Right Pane: "The Server Warehouse" (Remote)
Demonstrate a "Drag and Drop" upload. Explain why SFTP (Port 22) is the only way to send passwords securely.
35-55 Min
Activity: FTP Survival Lab
Students complete the FTP Survival Worksheet . They must identify connection errors, map local-to-remote paths, and draft a Git commit message for a specific change.
55-60 Min
Check for Understanding
Ask: "If I delete a file on the server (Right side), does it disappear from my computer (Left side)?" (Answer: No, they are separate copies).
Safety Warnings
FTP Survival Worksheet FTP Survival Lab
Connecting, Navigating, and Deploying Safely
STUDENT ID: ___________________________
DATE: ___________________________
TASK 01 // DEBUGGING THE CONNECTION
A developer is trying to connect to their server but keeps getting an error. Review the logs below and identify the mistake.
Status: Connecting to 12.345.67.89...
Response: fzSftp started, protocol_version=11
Command: open "admin_user@12.345.67.89" 21
Error: Received unexpected end-of-file from SFTP server
Error: Could not connect to server
What is wrong with the connection attempt above?
Hint: Look at the relationship between the protocol (SFTP) and the Port number.
TASK 02 // DIRECTORY MAPPING
Where do your files go? On most Linux servers, the "Public" folder has a specific name. Draw a line to match the Local file to its correct Remote destination.
LOCAL (Your Computer)
/Desktop/Project/index.html
/Desktop/Project/images/logo.png
REMOTE (The Server)
/var/www/html/images/logo.png
/var/www/html/index.html
TASK 03 // THE "COMMIT" MESSAGE
In Version Control (Git), a "Commit Message" tells your teammates what you changed and why . A good message is concise and active.
Scenario:
You fixed a bug where the "Submit" button on the contact page wasn't working in mobile view. You also updated the logo to a higher resolution version.
Draft a professional Commit Message for these changes:
git commit -m "__________________________________________________________________________________________________________________________________________________________________"
CMS Command Slides Digital Literacy // CMS Systems
CMS COMMAND
Building Dynamic, Database-Driven Web Experiences.
L3: PLATFORMS
Static vs. Dynamic Sites
01 // Logic
Static (HTML/CSS)
The server simply sends a pre-made file to the user. Every user sees the exact same thing.
Blazing fast performance
Hard to update (100 pages = 100 edits)
Dynamic (CMS)
The server "builds" the page on-the-fly using templates and data from a MySQL Database .
Easy updates (Change once, update all)
Requires more server resources
Anatomy of a CMS (WordPress)
02 // Components
Core
The engine. PHP files that handle the logic and user authentication.
Themes
The skin. Controls how the site looks without changing the content.
Plugins
The superpowers. Adds functionality like forms, SEO, or e-commerce.
Database
The memory. Stores your actual text, settings, and user comments.
The Deployment Checklist
03 // Execution
01
Create the Database
Use cPanel or phpMyAdmin to create a database and a user with a strong password.
02
Upload Files
Use FTP to move the CMS files to your server's root directory.
03
Run the Install Script
Navigate to your domain in the browser and enter your database credentials.
CMS Command Teacher Guide Teacher Guide: CMS Command
Lesson 3 // Deploying & Managing CMS Platforms
Ref: L3-CMS-TG
Lesson Overview
This lesson moves students from simple file management to platform deployment. They will learn the "Three-Legged Stool" of a CMS: The Files (PHP), the Database (MySQL), and the Connection (wp-config.php). This is often the steepest learning curve for students as it involves multi-step configuration.
Learning Objectives
Contrast static HTML sites with dynamic database-driven sites.
Set up a MySQL database and user via a hosting control panel.
Perform a manual installation of a CMS (e.g., WordPress).
Explain the function of themes and plugins in a CMS ecosystem.
Preparation & Materials
Slides: "CMS Command Slides" for instruction.
Checklist: "WordPress Launchpad Checklist" (1 per student).
Files: A zip of the latest WordPress core files downloaded.
Instructional Workflow
00-10 Min
The Hook: The Footer Date Challenge
Ask: "Imagine you have a website with 500 pages. It's January 1st. How do you update the '© 2025' in the footer to '© 2026' on every page?"
Explain that with static sites, this is a nightmare. With a CMS, you change one template file, and the database handles the rest instantly.
10-25 Min
The Architecture of Dynamic Sites
Use the slides to explain how the PHP engine "fetches" content from the MySQL database and "serves" it to the user. Use the Restaurant Analogy :
• The Menu (Theme): How the food looks and is presented.
• The Kitchen (PHP Core): Where the page is cooked/assembled.
• The Pantry (Database): Where the raw ingredients/text are stored.
25-50 Min
The Launchpad Lab
Hand out the WordPress Launchpad Checklist . Walk through the steps live on a projector while students follow along. Crucial: Ensure they write down their database name, user, and password immediately after creating them.
50-60 Min
Plugins: The "Double-Edged Sword"
Briefly discuss why having 50 plugins is bad (security risks, slow load times). Emphasize "Only install what you need."
Troubleshooting the "White Screen of Death"
If a student gets a blank white screen after installation, it's almost always a database connection error. Check their file. Common errors:
WordPress Launchpad Checklist WordPress Launchpad
Step-by-Step Installation & Configuration
NAME: ___________________________
URL: ___________________________
01 // The Database (Storage)
Before installing WordPress, you must create a home for your data. Log into your hosting panel and create a database. Record the details here exactly as you typed them.
Database Name
Database Username
Database Password
DB Host (Usually 'localhost')
02 // The Installation Walkthrough
Upload WordPress Files
Unzip the WordPress core and upload all files (not the folder itself) to your public_html directory via FTP.
Navigate to Site URL
Open your browser and go to your domain. You should see the WordPress "Welcome" screen.
Input DB Credentials
Enter the information you recorded in Part 01 above. If it fails, check your password and user permissions.
Finalize Site Setup
Choose your Site Title, Admin Username (Avoid "admin"!), and a strong password.
FIRST STEPS AFTER LOGIN
Delete "Hello World" Post
Set Permalinks to "Post Name"
Update all Core & Plugins
Install a Security Plugin
Visibility Lab Slides Digital Literacy // SEO Marketing
VISIBILITY LAB
Mastering Search Engine Optimization and Indexing.
L4: OPTIMIZATION
The Crawler's Journey
01 // Discovery
Crawling
Search engine bots (spiders) follow links from page to page, discovering new content.
Indexing
The engine stores a giant "map" of the page's words and where they are located.
Ranking
When someone searches, the engine uses 200+ factors to decide which pages appear first.
The On-Page Checklist
02 // Content
01
Meta Title & Description
The "sales pitch" that appears in search results. Must include keywords.
02
Header Tags (H1, H2)
Hierarchy matters. Use only one H1 per page for the main topic.
03
Alt Text
Describes images for accessibility and search engine "eyes."
The "Golden Rule"
Don't write for bots. Write for humans.
Google's algorithm is smart enough to penalize "keyword stuffing" and low-quality content.
Technical SEO Infrastructure
03 // Technical
Sitemaps (XML)
A roadmap for crawlers to find all your hidden pages.
HTTPS / SSL
Search engines prioritize secure sites. This is a ranking factor.
Mobile Responsiveness
If it doesn't work on a phone, Google won't rank it high.
Activity Preview:
"We are going to perform a live SEO audit on a website of your choice to see how it speaks to search engines."
Search: site:example.com
Use this operator to see exactly which of your pages are indexed.
Visibility Lab Teacher Guide Teacher Guide: Visibility Lab
Lesson 4 // Search Engine Optimization (SEO)
Ref: L4-SEO-TG
Lesson Overview
In this lesson, students learn that a published website is invisible unless search engines can find and understand it. We move beyond "content creation" to "content discoverability." Students will audit live sites and learn the technical metadata requirements for professional web publishing.
Learning Objectives
Describe the Crawl-Index-Rank lifecycle.
Identify missing on-page SEO elements (H1, Alt Text, Meta Data).
Use search operators like site: to verify indexing.
Explain the importance of mobile-first indexing and SSL for ranking.
Preparation & Materials
Slides: "Visibility Lab Slides" ready for projection.
Worksheet: "SEO Audit Worksheet" (1 per student).
Tools: Access to a web browser and a live URL (can be the student's own project).
Instructional Workflow
00-10 Min
The Hook: The Secret Phrase
Before class, create a very simple page on a domain you control with a unique nonsense phrase (e.g., "The Blue Zebra Dances at Midnight in 2026"). Search for it live in front of the class.
If it doesn't show up, ask why. Is it because Google doesn't know it exists yet, or because it's "NoIndex"? This leads into how crawlers work.
10-30 Min
How Google "Sees"
Use the Visibility Lab Slides . Show the difference between what a human sees (pretty images) and what a bot sees (HTML tags). Use the Library Analogy :
• Crawling: The librarian visiting every house to see if they have new books.
• Indexing: Putting the book on the shelf with the correct Dewey Decimal number.
• Ranking: Recommending the best book when a student asks a question.
30-50 Min
SEO Audit Lab
Students use the SEO Audit Worksheet to analyze a live website. They will inspect the source code to find Meta Titles, count Header tags, and check image Alt text.
50-60 Min
Debrief: The "Evil" of Keyword Stuffing
Discuss why "Black Hat" SEO (like hidden text or stuffing keywords) no longer works and can get a site banned from search results.
Mastering the site: Operator
SEO Audit Worksheet On-Page SEO Audit
Evaluating Search Engine Friendliness
NAME: ___________________________
TARGET URL: ___________________________
01 // Discovery Status
Go to Google and search for site:[your target URL]. Record your findings below.
Number of Results Found:
Does the "Meta Description" in the search result accurately describe the site?
Yes
No
No description shown
02 // Content Hierarchy
Right-click on the page and select "View Page Source" (or use Inspect Element). Find the following tags.
Target Element Value / Content Found SEO Grade (A-F) <title> <h1> <img alt="..."> <meta name="description">
03 // Strategy Memo
Based on your audit above, list three specific changes you would recommend to the site owner to improve their ranking for their primary keyword.
Final Conclusion:
Is this site currently "optimized" for search engines? Why or why not?
Site Shield Slides Digital Literacy // Maintenance
SITE SHIELD
Performance, Security, and Professional Maintenance.
L5: SUSTAINABILITY
The Security Perimeter
01 // Defense
SSL Certificates (HTTPS)
Encrypts data between the user and server. No SSL = "Not Secure" warning in browsers.
Backup Strategy
Off-site backups are mandatory. If the server burns down, do you have a copy elsewhere?
Update Hygiene
90% of hacks happen through outdated plugins or themes. Set a maintenance schedule.
Common Attacks
Brute Force (Login Guesses)
SQL Injection (Database Hijack)
XSS (Malicious Scripts)
DDoS (Traffic Overload)
Performance: Seconds Matter
02 // Speed
0.5s
Excellent
2.5s
Needs Work
4.0s
High Bounce Rate
7.0s+
Unusable
Google Lighthouse Scores
What it Measures:
Performance
Accessibility
Best Practices
"A 1-second delay in mobile load times can impact conversion rates by up to 20%."
Optimization Blueprint
03 // Improvement
Image Compression
Convert JPEGs to WebP format. Scale images to their display size before uploading.
Minification
Removing whitespace and comments from CSS and JS files to reduce file size.
Caching
Storing a "pre-built" version of your site so the server doesn't have to work as hard for every user.
Site Shield Teacher Guide Teacher Guide: Site Shield
Lesson 5 // Performance & Security Best Practices
Ref: L5-MAINT-TG
Lesson Overview
The final lesson focuses on the long-term health of a digital presence. We cover the "Shield" (Security) and the "Speed" (Performance). Students learn that a professional developer's job doesn't end at launch; it continues with audits, backups, and hardening.
Learning Objectives
Run a Google Lighthouse audit and interpret the results.
Distinguish between HTTP and HTTPS (SSL).
Propose a 3-2-1 backup strategy for a web project.
Explain how image compression and caching improve UX.
Preparation & Materials
Slides: "Site Shield Slides" ready for projection.
Log Sheet: "Performance Audit Log" (1 per student).
Software: Google Chrome browser with Developer Tools enabled.
Instructional Workflow
00-10 Min
The Hook: PageSpeed Insights Duel
Ask students to name two major universities. Enter their URLs into Google PageSpeed Insights (or use the Lighthouse tab in Chrome). Show the class the comparative scores.
Discussion: "Why is one score higher than the other? Does the prestigious name of the university guarantee a fast website?"
10-25 Min
Security Hardening
Using the Site Shield Slides , cover SSL, Strong Passwords, and the concept of "Least Privilege" (only giving users the access they need). Explain the 3-2-1 Backup rule: 3 copies of data, 2 different media, 1 copy off-site.
25-50 Min
Performance Audit Workshop
Students use the Performance Audit Log to run audits on three different sites: a major news site (like CNN), a personal blog, and their own class project. They will identify the "Worst Offenders" (usually giant uncompressed images).
50-60 Min
The Maintenance Contract
Explain that professional agencies charge a monthly fee for this work. Ask: "Is it worth $100/month for a business to know their site is backed up and secure?"
The "Quick Fix" for Performance
If a student's project has a performance score below 50, it is almost certainly due to images. Teach them the difference between Scaling (physical dimensions) and Compression (file weight). A 4000px wide photo being shown in a 200px box is a "performance crime."
Performance Audit Log Performance Audit Log
Lighthouse Analysis & Optimization Roadmap
AUDITOR: ___________________________
DATE: ___________________________
Instructions
Open Google Chrome. Press F12 (or Cmd+Option+I) to open Developer Tools. Click the Lighthouse tab. Click "Analyze page load" for Mobile or Desktop. Record the scores below.
01 // Comparative Metrics
Site URL Performance Accessibility Best Practices Example: cnn.com 24 88 75 1. ______________________ 2. ______________________ 3. ______________________
02 // The "Opportunities" List
For your lowest scoring site , look at the "Opportunities" section in the Lighthouse report. List the top three suggested improvements.
1
2
3
03 // The Security Perimeter
SSL Status Check
Does the site have a padlock icon in the URL bar? If not, what warning does Chrome show?
The "Failsafe" Plan
If you were the developer, where would you store the weekly backup of the database?