Measuring Basics Slides Inches for Independence
Measuring Basics
UNIT 1 • LESSON 1
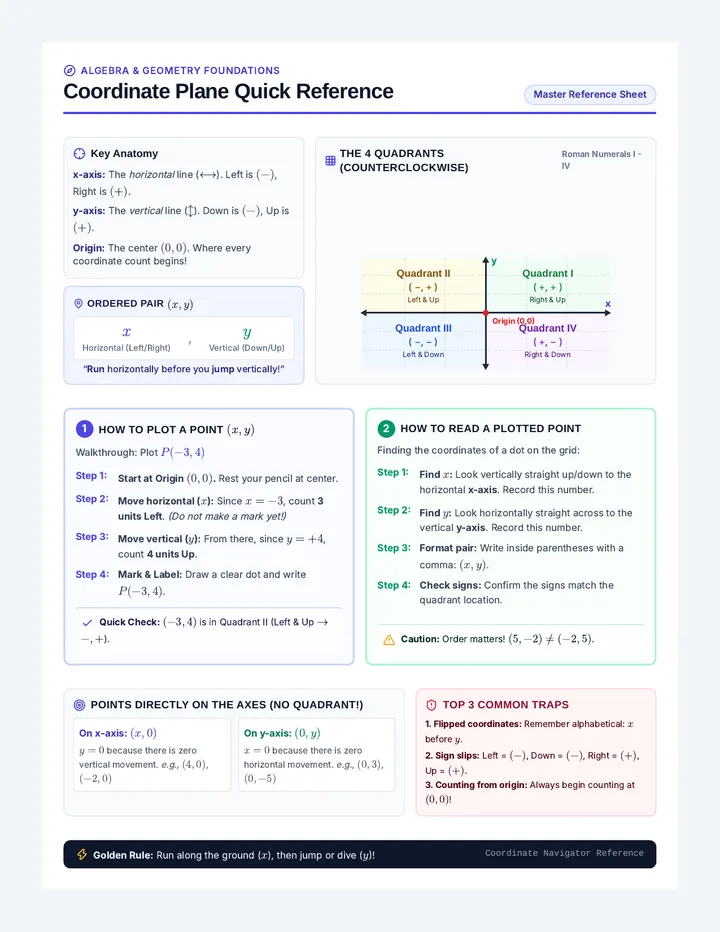
Why Do We Measure?
Measuring length tells us how long an object is from one end to the other. In the real world, we need this for:
Sizing parts for repairs and building
Checking package dimensions for shipping
Fitting furniture inside a room
DAILY SKILLS WARM-UP
Look around your desk. Find one object that is shorter than your forearm. Show it to your partner!
Focus: Identifying start points & aligning objects Slide 1 of 4
Inches for Independence
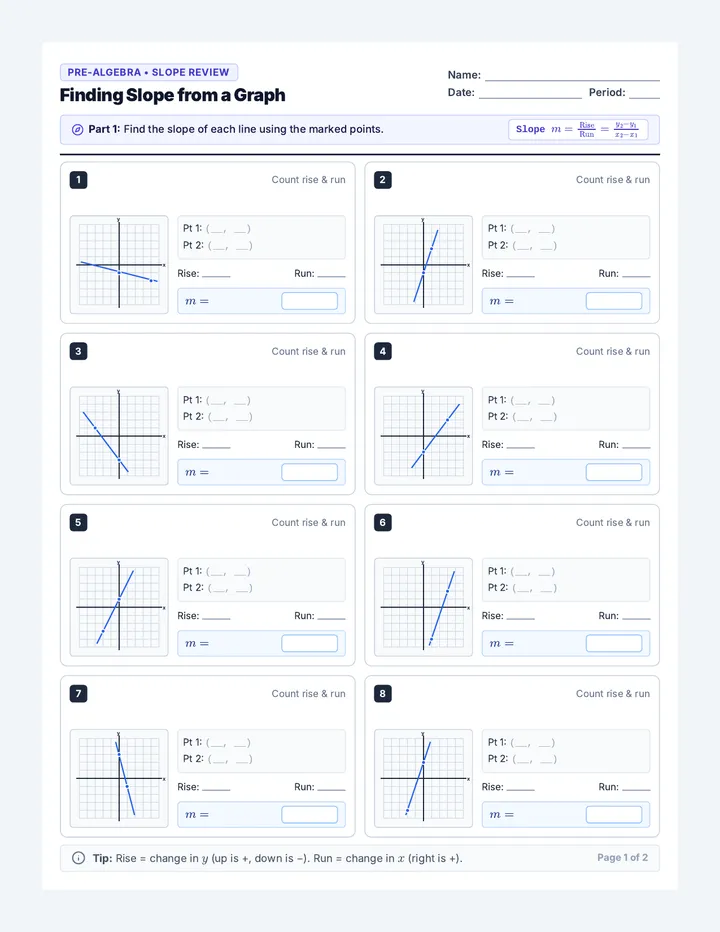
The Golden Rule: Align to Zero
RULE 1
CORRECT Alignment
The edge of your object must align exactly with the zero mark on your ruler, not the physical wooden edge.
Crayon aligned to zero
| 0 | 1 | 2
INCORRECT Alignment
Do not align the object to the physical end of the ruler or start in the middle! This causes wrong answers.
Crayon is offset
| 0 | 1 | 2
Tip: Always spot the "0" line before you look at the object's end. Slide 2 of 4
Inches for Independence
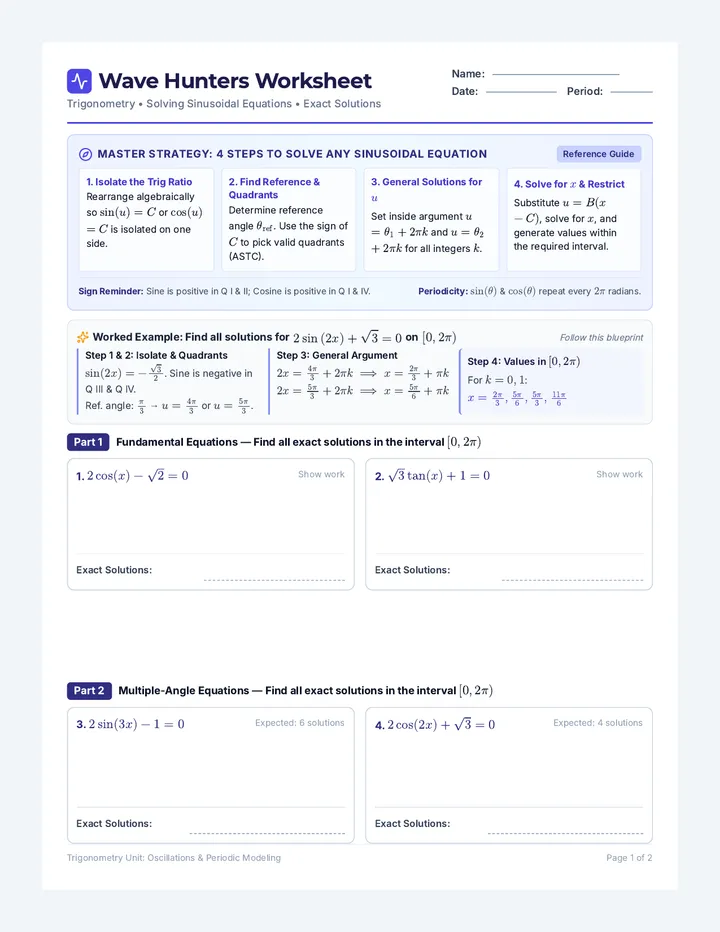
Meet the Standard Inch
UNIT
What is an Inch?
An inch (in.) is a standard unit of length in the US customary system.
We use "standard" units so that an inch in our classroom is exactly the same as an inch in a hardware store or on a shipping dock!
Abbreviation: we write in. or use the " symbol (e.g., 5 in. or 5").
Real-World Benchmarks
These common items are about 1 inch long:
📎 Paperclip (Width)
🪙 Quarter Coin
👍 Thumb (Top Joint to Tip)
Benchmarks help us estimate when we don't have a ruler! Slide 3 of 4
Inches for Independence
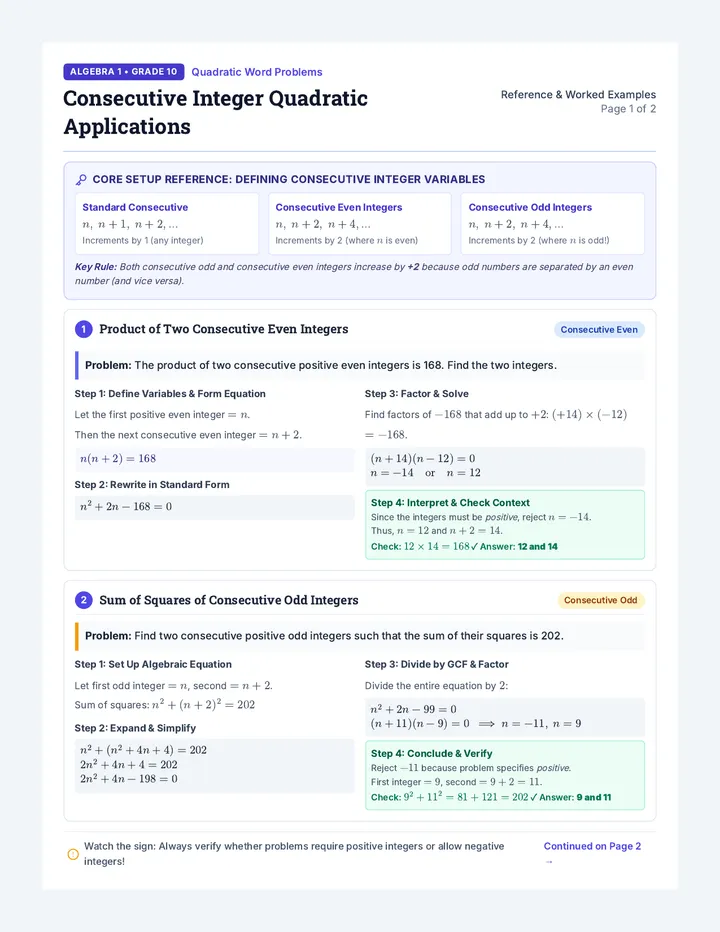
Partner Challenge: Check the Start
CHALLENGE
Ready to Measure?
Before measuring an object with your ruler, run this Quick 3-Point Audit with your table partner:
1 Is the ruler straight against the side of the object?
2 Is the left end lined up with the zero line ?
3 Are you looking straight down at the final marking (not from an angle)?
Hands-On Practice
Open your Measuring Basics Worksheet .
We will use our paper rulers to verify alignment and complete the starting challenges together!
Remember: Accurate starts lead to perfect finishes.
Get ready to use your worksheets! Slide 4 of 4
Measuring Tools Guide Inches for Independence • Visual Anchors & Tools
Workplace Rulers & alignment guide
HANDS-ON UTILITY
Teacher & Student Preparation Guide:
Cut carefully along the dotted lines to create your individual paper rulers and alignment template. If possible, laminate these tools for durability in daily shop and workspace activities!
Ruler A: Whole Inches Only Cut along outer dashed lines
INCHES FOR INDEPENDENCE • 1"
0
1
2
3
4
5
6
Ruler B: Half Inches (1/2") Cut along outer dashed lines
INCHES FOR INDEPENDENCE • 1/2"
0
1/2
1
1/2
2
1/2
3
1/2
4
1/2
5
1/2
6
Alignment Guide Card
Slide this card's orange edge to line up exactly with the start of your item. Place your ruler's 0-mark along the guideline.
ZERO ALIGNMENT EDGE
3-Step Check Card
Find the 0 line on the ruler.
Lining it up with the object's start.
Read the number at the object's end.
MEASURING WORKPLACE STANDARD
Inches for Independence Curriculum Page 1 of 1
Measuring Basics Worksheet Inches for Independence • Worksheet
Starting Line Alignment
L1 PRACTICE WORK
Name:
Date:
1
Part 1: Starting Line Audit
Circle whether the object is lined up CORRECT or INCORRECT with the starting zero mark of the ruler.
A. Wooden Dowel Pin Problem 1
Dowel Pin
0"1"2"3"4"5"
CORRECT
INCORRECT
B. Metal Framing Screw Problem 2
Framing Screw
0"1"2"3"4"5"
CORRECT
INCORRECT
2
Part 2: Hands-On Measuring
Use your cut-out Ruler A (Whole Inches) to measure each line. Align the zero mark with the orange line.
Item A (Electrical wire segment) START (0") ➔
Length
inches
Item B (Plywood trim slice) START (0") ➔
Length
inches
Item C (Copper coupling pipe) START (0") ➔
Length
inches
💡 WORKPLACE MINDSET:
If you align the physical end of your ruler to the start of a workpiece instead of the zero line, will your measurement be too long or too short? Discuss with your teammate!
Inches for Independence Curriculum • Lesson 1 Practice Page 1 of 1
Ruler Rules Slides Inches for Independence
Ruler Rules: Zooming In
UNIT 1 • LESSON 2
When Whole Inches Aren't Enough
In real life, workpieces, screws, and boards are rarely exact whole numbers. To build or ship accurately, we must read fractional marks :
1/2" Half-inch marks (Exactly in the middle)
1/4" & 3/4" Quarter-inch marks (Even more precise)
VOCABULARY CHECK
A fraction is a part of a whole. Think of a pizza cut into 2 or 4 equal slices!
Focus: Identifying 1/2" and 1/4" markings on a standard ruler Slide 1 of 4
Inches for Independence
The Half-Inch (1/2") Mark
HALF INCH
Finding the Middle
The half-inch line is exactly halfway between two whole numbers.
It is the second longest line on your ruler. It separates each whole inch into two equal halves.
Examples:
Lying between 1 and 2 is 1 1/2"
Lying between 3 and 4 is 3 1/2"
Visual Ruler Breakdown
0
1/2
1
The orange line marks exactly half of an inch!
A standard ruler split this way gives us double the measuring power! Slide 2 of 4
Inches for Independence
The Quarter-Inch (1/4" & 3/4") Marks
QUARTER INCH
Slicing into Fours
If we divide an inch into four equal parts , we get quarter-inches.
Quarter lines are shorter than half-inch lines, but extremely important for precision work!
The Four Steps:
1/4"
2/4" (1/2")
3/4"
4/4" (1")
The 4-Step Breakdown
0
1/4
1/2
3/4
1
Quarter marks are the stepping stones between whole inches!
Now, let's practice reading actual objects using these landmarks! Slide 3 of 4
Inches for Independence
Classroom Practice: Spot the Fraction
TEAM QUIZ
Read the Length!
Look at the workpiece on the right. Run the Audit check:
Aligned perfectly with 0 ? Yes!
Where is the right edge pointing?
Is it on a half, quarter, or whole mark?
Metal Plate
Ruler Rules Task Cards Inches for Independence • Hands-On Practice
Workplace Measure Task Cards
ACTIVITY CARDS
Instruction for Workspace Activity: Cut along the dotted borders to separate the four workplace "Work Order" cards. Use Ruler B or a real workspace ruler to verify the dimensions of each material piece on the cards!
Work Order #101 BOLT SIZE
Measure the steel hexagonal bolt to the nearest half-inch (1/2"):
0" 1/2 1" 1 1/2" 2"
Actual Length:
Work Order #102 CABLE CUT
Measure the copper core electrical wire to the nearest quarter-inch (1/4"):
0" 1/2 1" 1 1/2 2" 2 1/4" 3"
Actual Length:
Work Order #103 WOOD TRIM
Measure the pine molding trim piece to the nearest quarter-inch (3/4"):
0" 1/2 1" 1 1/2 1 3/4" 2"
Actual Length:
Work Order #104 CONDUIT PIPE
Measure the copper pipe sleeve to the nearest whole inch (1"):
0" 1" 2" 3" 4"
Actual Length:
Inches for Independence Curriculum • Lesson 2 Hands-On Task Cards Page 1 of 1
Ruler Rules Worksheet Inches for Independence • Worksheet
Reading Ruler Ticks
L2 INDEPENDENT WORK
Name:
Date:
1
Part 1: Nearest Half Inch (1/2")
Read each ruler illustration and write down the measurement of the object in the blank box.
Problem 1: Flat Steel Bracket
01/211 1/22
LENGTH
inches
Problem 2: Copper Solder Pipe
01233 1/24
LENGTH
inches
2
Part 2: Nearest Quarter Inch (1/4" or 3/4")
Take your time and zoom in to find the correct quarter marking!
Problem 3: Machine Screw
0122 1/42 1/23
LENGTH
inches
Problem 4: Plastic Anchor Plug
011 1/21 3/42
LENGTH
inches
💡 EXTRA CHALLENGE TRIVIA:
How many quarter-inches (1/4") are there in one complete whole inch? Draw four slices on a piece of scratch paper to prove your answer!
Inches for Independence Curriculum • Lesson 2 Practice Page 1 of 1
Length Estimates Slides Inches for Independence
Length Estimates
UNIT 1 • LESSON 3
Developing Your Measuring Eye
An estimate is a smart guess based on what you already know.
In daily life, we don't always carry a physical ruler. Being able to estimate helps you buy the right rug, pack box dimensions, or gauge building materials on the spot!
PARTNER QUICK GUESS
Hold your hands apart by what you think is exactly 10 inches.
Have your partner use their paper ruler to check how close you were!
Focus: Mastering daily benchmarks for rapid length estimation Slide 1 of 4
Inches for Independence
Your Built-In Benchmarks
BENCHMARKS
👍
1 INCH
The length from the top joint of your thumb to the tip.
Thumb Joint
💳
3 INCHES
The long side of a standard credit card or student ID.
ID / Card
📱
6 INCHES
The average height of a standard smartphone in its case.
Smartphone
👣
12 INCHES
The length of a large floor tile or an adult's physical foot.
1 Foot Tile
Using physical items as guides makes estimation simple and extremely fast! Slide 2 of 4
Inches for Independence
The Estimate & Verify Loop
THE LOOP
STEP 01
Analyze with Benchmarks
Hold up your thumb joint, card, or phone next to the target object. Ask: Is it longer or shorter?
STEP 02
Record Smart Guess
Write down your initial estimate before putting a physical ruler to the object. No changing it!
STEP 03
Measure & Compare
Align your ruler exactly to zero and measure. See how close your smart guess was. The more you do this, the better your eye gets!
Verifying with a ruler reinforces your mental model of an inch! Slide 3 of 4
Inches for Independence
Classroom Scavenger Hunt
HUNT TIME
Ready to Hunt?
We are going to search the classroom for real-world items that match different size categories.
Grab your Length Estimates Worksheet and a pencil. You'll work in your trade crews of two to find and verify!
Ground Rules for Crews
Length Estimates Worksheet Inches for Independence • Worksheet
Estimation Scavenger Hunt
L3 ESTIMATION & VERIFICATION
Name:
Date:
1
Part 1: Match Your Benchmarks
Draw a straight line from the benchmark image/object on the left to its approximate standard length on the right.
📱 A. Average Smartphone height
👍 B. Joint of your thumb to tip
👣 C. Standard Floor Tile length
💳 D. Student ID / Credit Card width
1 Inch ●
3 Inches ●
6 Inches ●
12 Inches (1 ft) ●
2
Part 2: Classroom Hunt Log
Find each item. Use a benchmark first to Estimate , then use a real ruler to Measure the exact size!
Target Classroom Item Benchmark Used Smart Estimate Actual Measure Close? 1. Whiteboard Marker Measure long end to end Suggestion: ID Card / Phone
| YES / NO |
| 2. Spiral Notebook Spine Measure long vertical bound | Suggestion: Floor Tile / Phone |
|
| YES / NO |
| 3. Computer Keyboard Measure short side width | Suggestion: Phone / ID Card |
|
| YES / NO |
💡 WORKPLACE PRINCIPLE:
"Measure twice, cut once." Even the most experienced builders use their eye to check if a measurement makes sense before completing a cut. How does estimating protect expensive materials from waste?
Inches for Independence Curriculum • Lesson 3 Practice Page 1 of 1
Compare Lengths Slides Inches for Independence
Comparing Lengths
UNIT 1 • LESSON 4
Mastering Differences
Measuring objects is only the first step. In the workplace, we need to compare measurements to:
Determine if a spare part is too short or too long
Order screws from smallest to largest in a toolbox
Calculate how much material to trim off a board
TRADE BRAIN WARM-UP
If you have a 6-inch board, but you only need a 4-inch board for a shelf, how much wood do you need to cut off?
Focus: Finding differences between measurements and ordering items Slide 1 of 4
Inches for Independence
How to Find the Difference
THE FORMULA
The Subtraction Rule
The difference is the gap between two lengths.
To find the difference, always subtract:
Longer Length - Shorter Length
Example: 5 in. minus 2 in. leaves a gap of 3 in.
Visualizing "The Gap"
Board A (5 inches)
5"
Board B (3 inches)
3"
Difference = 2"
Subtracting makes comparisons exact and reliable! Slide 2 of 4
Inches for Independence
Ordering Your Inventory
ORDERING
Shortest to Longest
In assembly, we often organize components sequentially.
Always read from left to right. Identify the smallest number first, then the next, up to the largest number.
Pro Tip: Ordering works the exact same way for whole inches, half inches, and quarters!
Sorted Toolbox Items
Screw A 1 1/4" Shortest
Screw B 2 1/2" Middle
Screw C 4" Longest
Keeping inventory sorted prevents assembly errors! Slide 3 of 4
Inches for Independence
Let's Calculate Together!
TEAM CHALLENGE
What's the Difference?
Look at the two workpiece bars on the right:
1 How long is Cable X ?
2 How long is Cable Y ?
3 Subtract the smaller from the larger.
Cable X 4 Inches
Cable Y 1 1/2 Inches
Open your Compare Lengths Worksheet and write down the subtraction equation to solve!
Get ready to use your rulers and complete Lesson 4! Slide 4 of 4
Compare Lengths Worksheet Inches for Independence • Worksheet
Comparing & Subtracting
L4 INVENTORY CALCULATIONS
Name:
Date:
1
Part 1: Calculate the Difference (The Gap)
Subtract the smaller length from the larger length to find the exact difference.
Problem 1: Steel Dowels
• Dowel A length: 5 inches
• Dowel B length: 2 inches
Equation: 5" - 2" =
DIFFERENCE
inches
Problem 2: Metal Framing Screws
• Screw C length: 4 1/2 inches
• Screw D length: 1 1/2 inches
Equation: 4 1/2" - 1 1/2" =
DIFFERENCE
inches
2
Part 2: Sort Inventory (Shortest to Longest)
Arrange the pieces in order from shortest length to longest length. Write the numbers in the spaces below.
Inventory Set A: Pipes
Pipe X 6 inches
Pipe Y 1 1/2 in.
Pipe Z 3 inches
1. Shortest:
2. Middle:
3. Longest:
Inventory Set B: Cables
Cable L 2 1/4 in.
Cable M 4 3/4 in.
Cable N 1/2 inch
1. Shortest:
2. Middle:
3. Longest:
💡 REAL-WORLD DECISION MAKING:
You have an open space in a cabinet that is 8 1/2 inches wide. Can you fit a router device that is 9 inches wide inside that space? Explain your math to your partner!
Inches for Independence Curriculum • Lesson 4 Practice Page 1 of 1