Flight Academy Intro Slides Flight Academy: Unit 1.1
SAFE LANDINGS
"Mastering the art of coming back to Earth."
Physical Education / Grade 5
The Stealth Challenge
How quietly can you jump and land?
The Mission:
Jump as high as you can.
Land so quietly that a sleeping cat wouldn't wake up.
What did your body have to do to stay silent?
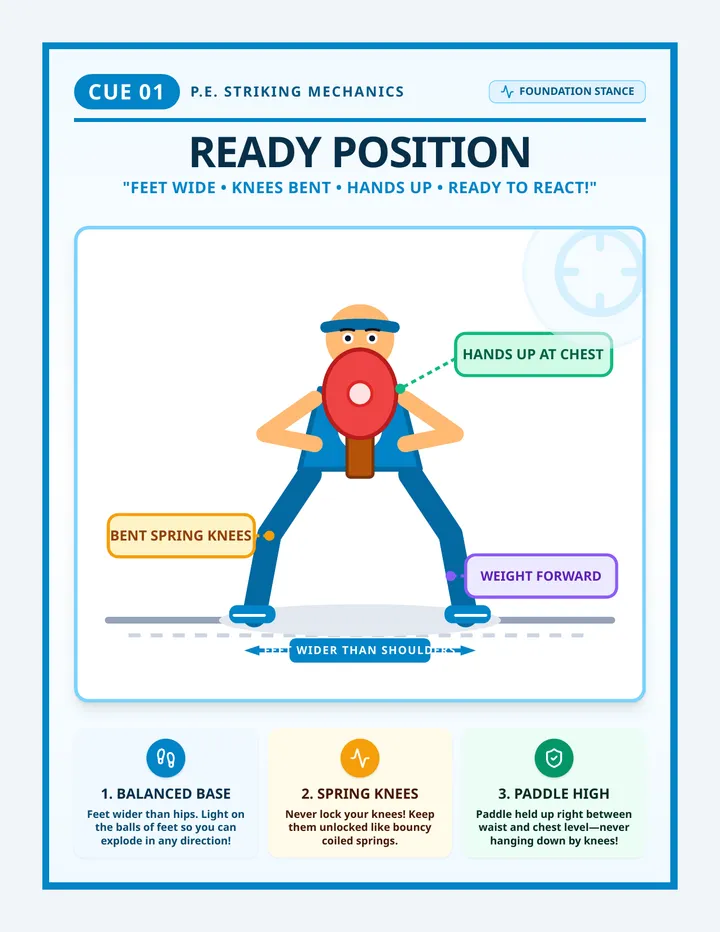
Safety Protocol: The Motorcycle
01
Wide Base
Feet shoulder-width apart. Like a sturdy kickstand!
02
Shock Absorbers
Bend knees and hips. Never land with "locked" legs.
03
Handlebars Out
Arms forward for balance. Don't let your chest drop!
The Standing Broad Jump
1
The Swing
Swing arms back forcefully while bending knees. Load the springs!
2
The Drive
Explode forward! Swing arms up and out. Hips drive the power.
3
The Reach
Reach forward with your heels to grab extra distance before landing.
POWER = SPEED + FORCE
"It's not just how hard you jump, it's how fast you move your arms and hips together."
Lab Protocol
Phase 1: Landing
• Partner check for "Quiet Feet"
• Bend to 90 degrees at hips/knees
• Arms forward for balance
Phase 2: Distance
• 3 practice broad jumps
• Measure from back of the heel
• Try to increase distance by 2 inches
SYSTEM CHECK: READY TO JUMP
Landing and Launch Worksheet Flight Lab: Launch & Land
Unit 1.1: Standing Broad Jump Mechanics
Pilot:
Date:
Part 1: The Motorcycle Landing
Perform 5 quiet landings. Have a partner check your form for each attempt. Use the symbols: (Success) or (Needs Work).
Trial 1
Trial 2
Trial 3
Trial 4
Trial 5
Self-Reflection:
What was the hardest part of landing quietly?
Part 2: Explosive Launch Log
Attempt Focus Point Distance (in/cm) 01 Arm Swing Timing 02 Hip Drive / Push 03 Full Body Extension
Technique Review
Circle the mechanic that helped you gain the most distance:
Lower Knee Bend
Faster Arm Swing
Heel Extension at Landing
Flight Data
Personal Best Distance:
Target for Next Class:
Safe Takeoff Teacher Guide Teacher Resource
Safe Landings & Broad Jumps
Instructional Guide for Unit 1.1
Est. Time
45-50 Min
Learning Objectives
Students will demonstrate the "Motorcycle Landing" with 100% safety compliance.
Students will apply coordinated arm swings to increase standing broad jump distance.
Students will measure and record performance data with peer accuracy.
Key Vocabulary
Propulsion The force that pushes the body forward.
Absorption How the body takes in impact during landing.
Center of Gravity The point where mass is balanced.
Lesson Flow
0-10 Min
The Hook: Quiet Jumps
Activity: Challenge students to jump and land as quietly as possible.
Discussion Prompt: "What did your knees do to keep things quiet? What happened to your feet? Why did you need your arms out?" Connect these intuitive reactions to the technical mechanics of safety.
10-25 Min
Skill 1: Motorcycle Landing
Focus on the 3 keys: Wide Base, Deep Bend, Balanced Arms.
Cues
"Knees over toes", "Sit back in the chair", "Eyes forward".
Common Errors
Landing on heels, knees knocking inward (valgus), torso leaning too far forward.
25-45 Min
Skill 2: Broad Jump Log
Transition to the launch. Emphasize that the arms provide 10-15% of the total distance.
Drill: "Reach for the Sky" – Swing arms back, then up and out. Challenge students to look for the "V-shape" in their body at full extension.
Logistics: Set up 4-5 lanes with tape measures taped to the floor. Students work in pairs to measure from the back-most heel mark.
Assessment Checklist
• Does the student bend knees to at least 45° on landing?
• Are the feet landing simultaneously (not one-two)?
• Is the student measuring accurately from the heel?
Differentiation
Challenge: Practice jumping over a low soft barrier (foam block) to emphasize height.
Support: Use a hula hoop as a target landing zone to focus on accuracy and balance rather than distance.
Takeoff Rhythm Slides Flight Academy: Unit 1.2
THE RHYTHM RUN
"Building speed, finding power, and hitting the mark."
Approach and Takeoff Mechanics
The Power Foot
Which foot is your engine?
The "Power Foot" is the leg you use to explode off the ground. Most people have one leg that is naturally stronger or more coordinated for a takeoff.
The Lean Test:
Stand tall with feet together. Close your eyes. Have a partner gently nudge you forward. The foot you "catch" yourself with is usually your Power Foot!
The Rhythm Ladder
A great long jump is like a song. It has a specific rhythm:
RUN
Slow & Smooth
RUN
Building Speed
POP!
Max Speed & Lift
"Don't look down at the board! Keep your eyes on the horizon to keep your chest up for flight."
Precision: The Board
1
Consistent Strides
Start from the exact same spot every time. Count your steps!
2
The Foul Line
Your toe cannot cross the line. If you are too close, move your start back a "foot-length".
Avoid the Foul!
Measuring your run is the secret to a legal jump. Professional athletes measure their start to the centimeter!
Power Foot Finder Worksheet Power Foot Finder
Flight Academy: Protocol 1.2
Name:
Test 1: Natural Reaction
Stand tall with feet together. Have your partner stand behind you and give a light "nudge" to your shoulders. record which foot you move forward to stop yourself from falling.
LEFT
RIGHT
Draw a quick sketch of your foot catching the floor!
Test 2: Consistent Approach
Run from your starting mark to the takeoff board. Your partner will count how many steps you take. Try to make it the same number every time!
Run 1
_____ steps
Run 2
_____ steps
Run 3
_____ steps
Goal #
_____ steps
My Takeoff Profile
My Official Takeoff Foot:
Distance of Run-up (Feet/Meters):
Pro Tip: If you are consistently hitting the board with the wrong foot, try moving your starting mark 1 step further back!
Rhythm Ladder Teacher Guide Teacher Facilitation
Approach Rhythm & Takeoff
Instructional Guide for Unit 1.2
Lab Setup
Rhythm Ladders (flat on floor)
Tape measures or marked runways
Takeoff boards (wood or tape)
Safety Focus
"Remind students that 'Board Watching' (looking down at the feet during the run) is the #1 cause of poor jumps and neck strain. Eyes must stay up!"
Rhythm Drills
1
The Rhythm Ladder Hook
Set up a ladder where the first 5 rungs are evenly spaced (for building speed), and the last 2 rungs are slightly wider or closer to force a "short-short-long" or "long-short-short" adjustment.
Observation Cue:
Watch for students "stutter-stepping." If they have to chop their steps, they need to move their starting point by a half-step.
2
Takeoff Foot Power Drill
Have students run and perform a "single-leg pop" off their power foot onto a mat. Focus on the opposite knee driving high towards the ceiling.
Coaching Cue
"Knee to chin!"
Coaching Cue
"Punch the air!" (Opposite arm swing)
Common Issues & Fixes
Problem Adjustment Consistently fouling (over the line) Move starting mark back exactly one shoe-length. Taking off too early (behind the board) Move starting mark forward exactly one shoe-length. "Chopping" steps at the end Focus on the 'Run-Run-Pop' vocal rhythm; smooth acceleration.
Flight Mechanics Slides Flight Academy: Unit 1.3
THE HANG TIME
"Maximizing air time and reaching for the horizon."
Mid-Air Body Control
The Hang Technique
The goal in the air is to stay balanced and keep your feet up as long as possible.
The "C" Shape:
Chest is out and proud.
Arms reach high above the head.
Knees stay bent and trail behind.
Fight Gravity
"The longer you stay in the 'C' shape, the more time your legs have to prepare for the landing."
The "L" Landing
1
Leg Extension
Snap your legs forward just before hitting the sand.
2
The Reach
Reach your hands towards your toes to keep your balance forward.
The Golden Rule
"Distance is measured from the board to the mark closest to the board."
If you fall backward, you lose distance!
The Flight Path
Phase 1
Takeoff
Upwards angle (30-45°)
Phase 2
Apex
The "Hang" shape
Phase 3
Extension
Legs out for distance
Flight Path Tracker Worksheet Flight Path Tracker
Unit 1.3: Flight Mechanics & Landing Extension
Pilot:
The Apex Challenge
During your jump, focus on reaching your hands to the sky at the highest point (the apex). Partner: Use a phone or watch to observe if their hands reach head-height in the air.
Jump 1
Hands reached sky?
Y
N
Jump 2
Hands reached sky?
Y
N
Jump 3
Hands reached sky?
Y
N
Landing Zone Mapping
"Don't leave your distance in the sand!" Map out where your heels hit vs. where your body ends up.
TAKEOFF
The Landing Pit
Self-Analysis:
Did you fall backward on any jumps?
How many inches/cm did you gain by extending your legs?
Total Flight Distance
Record your longest jump today (measured correctly):
DIST: _____
Remember: Fall Forward. Falling backward counts as a shorter jump!
Landing Zone Teacher Guide Teacher Facilitation
The Physics of Flight
Instructional Guide for Unit 1.3
The Elastic Hook
Set up a low elastic cord (or a soft foam hurdle) about 1 meter past the takeoff board. Challenge students to jump over it. This forces the legs up and prevents a "flat" flight path.
Key Visuals
The "C" (Hang)
The "L" (Landing)
Mid-Air Drills
1
The Kneeling Pull-up
Students stand on the edge of the pit. They perform a standing jump, but in mid-air, they must pull their knees to their chest and land with feet as far forward as possible.
Focus: Core strength and leg speed.
2
The "Reach and Snap"
Practicing the landing transition. Students jump from a small box (approx. 12 inches) to feel the sensation of extending legs forward and reaching arms to toes before impact.
SAFETY NOTE: Ensure pit is properly raked and leveled between every 3-5 jumps to prevent ankle rolls on uneven sand.
The "Foul or Fair" Check
Measuring correctly:
Measure from the edge of the board to the nearest break in the sand. This includes hand marks, butt marks, or heels.
Coaching Tip:
If students are landing with feet too wide, place two pool noodles in the pit to create a "lane" for their feet to stay together.
Triple Jump Phases Slides Flight Academy: Unit 1.4
THE TRIPLE RHYTHM
"Hop, Step, Jump: The ultimate rhythmic challenge."
Triple Jump Introduction
The 1-1-2 Formula
1. THE HOP
Take off on your power foot... and land on that SAME foot.
RIGHT → RIGHT
2. THE STEP
Drive your other knee forward and land on the OTHER foot.
RIGHT → LEFT
3. THE JUMP
Final explosive launch! Land on BOTH feet in the pit.
LEFT → BOTH
Listen to the Jump
"If you listen to the feet hitting the ground, it should sound like a drum beat:"
BUM Hop
BUM Step
PAAA! Jump
The Goal: Even spacing! If your 'Hop' is too big, your 'Step' will be tiny. Balance is key!
Today's Drills
A
Clap the Rhythm: Watch a peer and clap as their feet hit the ground.
B
The Grass Grid: Practice Hop-Step-Jump using cones or chalk marks on the grass.
C
Same-Other-Both: Say it out loud as you do it! This helps your brain and body connect.
Coordination King
"Triple jump is 20% power and 80% rhythm. Master the beat first!"
Triple Rhythm Log Worksheet Triple Rhythm Log
Unit 1.4: Hop-Step-Jump Mechanics
Athlete:
Part 1: The Drummer's Ear
Partner Activity: Listen to your partner's triple jump. Was the rhythm even? Circle the pattern you heard.
Pattern A
Bum... Bum... Bum
(Perfectly Even)
Pattern B
BUM!-bum-bum
(Big Hop, Tiny Step)
Pattern C
bum-bum... BAA!
(Short Phasing)
Part 2: Phase Distance Log
Attempt Hop (SAME) Step (OTHER) Jump (BOTH) Total 01 02 03
Brain Check
If your takeoff foot is RIGHT, list your full sequence of feet:
R
PIT
Which phase felt the most difficult today? Why?
Triple Jump Teacher Guide Teacher Facilitation
Triple Jump Rhythm Games
Instructional Guide for Unit 1.4
Grid Setup
Use flat rubber dots or chalk on grass. Create 3 tiers of "Grids":
The Secret Cues
"SAME-OTHER-BOTH"
"HOP-STEP-JUMP"
"Stay tall like a tree, not small like a flea!"
The Progression
1
The Rhythmic Clap Hook
Divide the class into "Athletes" and "Drums." The drums clap as the athlete's feet hit. If the athlete does it right, the claps are steady. If it's a "gallop," the drums will sound off-beat.
Focus: Auditory-visual synchronization.
2
The "Statue" Step
During the "Step" phase, students must try to freeze for a split second in mid-air with their knee held high before landing. This prevents the "gallop" error where the step is too fast.
Common Error: Jumping too high on the hop. Explain that a high hop results in a painful landing that kills forward momentum. Keep it long and low.
Support
Have students practice simply marching "Hop, Step, Jump" without the flight phase. Build the coordination before adding speed.
Extension
Challenge advanced students to measure their individual phases. The "Step" is usually the weakest—challenge them to make it as long as the "Hop."
Competition Rules Slides Flight Academy: Unit 1.5
THE FLIGHT MEET
"Showcasing speed, precision, and distance."
Competition and Peer Analysis
The Official's Creed
Every athlete today will also be a "Field Judge." Integrity is the most important skill!
The Rules of Judging:
White Flag: Fair Jump
Red Flag: Foul (Toe over line)
Fair Play
"A good official is silent, accurate, and fair to every single jumper."
Precision Measurement
Accuracy is everything in Track and Field. Follow these 3 steps:
1
Find the mark in the sand closest to the takeoff board.
2
Place the "Zero" end of the tape at that mark.
3
Pull the tape straight back to the takeoff board line.
Pro Measurement
"If you measure from the heel but the athlete's hand touched the sand behind them, you must measure from the hand!"
Event Rotation
Active Jumper
Ready at the start line. Begins when the judge says "Ready!"
Board Judge
Watches the foot. Calls "Fair" or "Foul." Rakes the board area.
Recorder
Reads the tape and writes the distance on the scorecard.
Good luck, Flight Academy!
Competition Judge Scorecard Official Meet Scorecard
Flight Academy Final: Level 1 Meet
Competitor:
My Competition Log
Jump # Result (Fair / Foul) Distance (ft/in or m/cm) Notes (e.g., "Fell back", "Great takeoff") 01 02 03 Best Performance:
Field Judge Log
Observe one other athlete during their 3 jumps. Provide honest, helpful feedback.
Athlete Observed:
Technique Checklist:
Consistent Approach
Strong Knee Drive
Safe Landing
One Strength I saw:
Final Reflection:
How has your jumping distance changed since Day 1 of Flight Academy? What is the main reason for the change?
Certified Athlete
Meet Director Guide Meet Director Guide
Flight Academy Final Meet
Culminating Unit 1.5
The Meet Format
Organize students into groups of 4. Each group manages one jump lane. Within the group, roles rotate after every 3 jumps:
Role 1: Jumper
Performs 3 consecutive jumps.
Role 2: Board Official
Checks for fouls and rakes sand.
Role 3: Tape Holder 1
Holds "0" at the sand mark.
Role 4: Recorder
Reads tape and logs on cards.
The Meet Cues
"Athletes to the mark!"
"Sand is level!"
"Jump is FAIR - Measure!"
Directing the Action
01
The Warm-Up (10 Min)
Students perform 2 practice run-throughs to check their approach marks. No measuring yet.
02
The Trials (25 Min)
Official competition jumps. Ensure the rake is used frequently. Remind recorders to write legibly—these are official records!
03
Awards & Debrief (10 Min)
Gather the academy. Celebrate not just the furthest jumps, but the "best technique" and "most fair judge."
Flight Academy Certificates
Suggested Award Categories for Lesson Wrap-Up:
The Apex Award:
Highest vertical flight path.
The Golden Rake:
Best sportsmanship/judging.
The Stick Award:
Most consistent safe landings.
The Power Foot:
Most consistent approach rhythm.