Tower Time Slides Tower Time
How high can you go?
The Challenge
Imagine you are a master builder. You want to build the tallest tower in the world!
But wait! What happens if it starts to wiggle?
Steady Hands
Eyes Watch
Look closely at the middle of the block.
Hands Move
Move slowly and let go gently.
Builder Tips
1
Find the middle of the block below.
2
Use your turtle hands (slow and steady).
3
If it falls, try again! Every builder makes mistakes.
Ready, Set, Build!
Go to your Stacking Stations
Tower Time Facilitation Guide Tower Time
Facilitation Guide
Fine Motor Skills
Lesson 1 of 5
Duration
30-40 Minutes
Materials
Wooden blocks, plastic cups, foam cubes, flat surfaces.
Key Skill
Controlled release and visual alignment.
1 Introduction & Hook
Gather students and use the Tower Time Slides to introduce the concept of building vertically. Ask: "What makes a tower fall down? What can we do with our hands to make it stay up?"
Teaching Note
Watch for students who "drop" the block rather than "placing" it. Model the "gentle release" using your fingertips.
2 The Centering Strategy
Demonstrate the "Looking From Above" technique:
Sit at eye-level with the base of the tower.
Hold the next block over the center.
Look down from the top to see if the block covers the one below it.
Slowly open fingers to release.
3 Exploration Stations
Station A: The Classics
Standard wooden unit blocks. Focus on alignment of edges and corners.
Station B: Cup Cascade
Plastic solo cups. Harder because they are lightweight and move easily.
Station C: Soft Stackers
Foam blocks. These compress slightly, requiring students to monitor pressure.
Station D: The Challenge
Irregular objects (stones, bean bags). Requires high-level visual estimation.
Differentiation Support
For Extra Support:
Provide a "guide box" or corner of two taped lines on the table to help students center their first few blocks.
For Extension:
Ask students to build "bridge towers" where two towers are connected by one block across the top.
Fine Motor Skill Tracker Skill Tracker
Fine Motor Observation Checklist
Teacher Resource
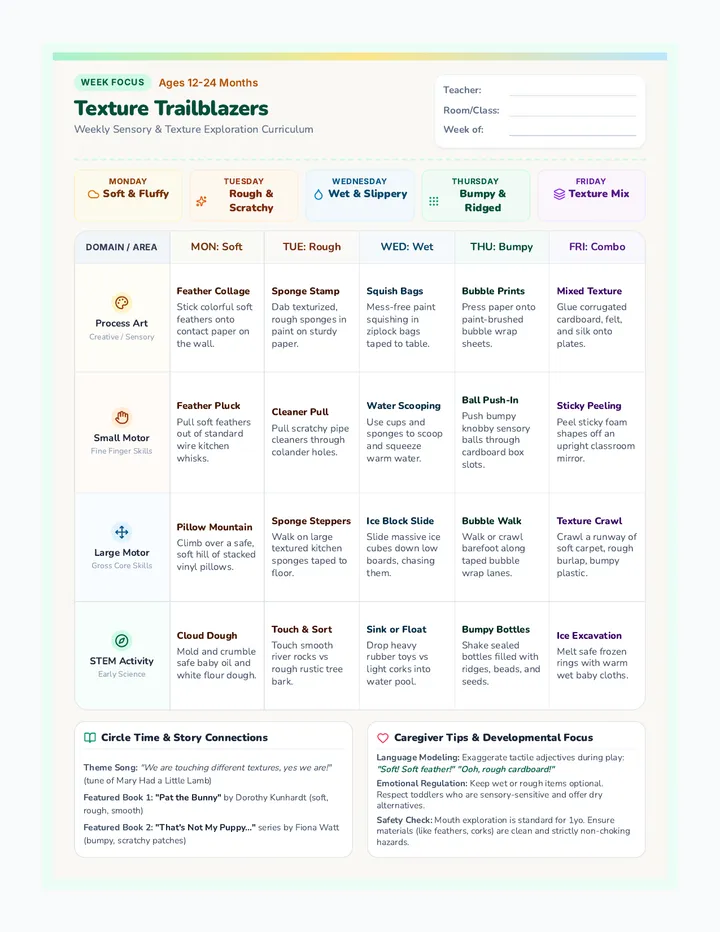
Steady Hands Sequence
Use this checklist to observe and record student progress during the "Steady Hands" sequence. Focus on the process (grip, alignment, focus) rather than just the final product.
| Student Name | Stacking
(Tower Time) | Threading
(Caterpillar) | Lacing
(Lacing Lines) | Beading
(Jewelry Joy) | Placement
(Dot Art) |
| --- | --- | --- | --- | --- | --- |
| | | | | | |
| | | | | | |
| | | | | | |
| | | | | | |
| | | | | | |
| | | | | | |
| | | | | | |
| | | | | | |
What to look for:
Grip: Using pincer grasp (thumb/pointer) vs palmar grasp.
Stability: Using a non-dominant "helping hand" to anchor.
Alignment: Visually tracking the target (hole, dot, or center).
Key Phrases:
"Look with your eyes, guide with your hands."
"Is your helping hand holding the base?"
"Move slowly like a turtle to be precise."
Caterpillar Crawl Slides Caterpillar Crawl
Feeding our hungry friends!
Meet the Caterpillar
Our caterpillars are very hungry. They need to eat their beads to grow long and strong!
Can you help them find the hole and slide the bead down?
Aim and Slide
The Eye
Look at the tip of the stick. Find the hole in the bead.
The Hand
Pinch the bead with two fingers. Push it all the way down!
Pattern Power
Make your caterpillar special with a pattern :
A-B:
A-A-B:
Let's Get Threading!
Go to your Caterpillar Stations
Caterpillar Pattern Cards Caterpillar Patterns
Pick a card and build your caterpillar!
Level 1: Red & Blue
Level 1: Yellow & Green
Level 2: A-A-B
Level 3: Rainbow
Challenge: Can you make your own pattern? Write it here!
Lacing Lines Slides Lacing Lines
The "In and Out" Adventure
Sewing a Border
Can you sew a beautiful frame around your picture?
Follow the path and don't skip a hole!
In and Out
Go IN
Push the tip of the string through the hole from the top.
Pull OUT
Reach underneath and pull it all the way through.
Flip and Find
1
Go through a hole.
2
Flip the card over.
3
Find the string on the back!
Teacher Pro-Tip:
Encourage students to use their "helping hand" to hold the card steady while the "working hand" does the sewing.
Start Weaving!
Time for Lacing Cards
Lacing Card Templates Lacing Card Fun
Punch holes and start your "In and Out" journey!
For Teachers: Print on heavy cardstock. Students (or adults) should use a hole punch on the small circles. Use tipped yarn or a plastic needle for lacing.
1
2
3
4
5
6
7
8
9
10
The Shiny Star
1
2
3
10
4
9
5
8
7
6
The Solid Square
Can you go all the way around without getting tangled?
Jewelry Joy Slides Jewelry Joy
Master Jewelry Designers
The Big Step Up
We used stiff sticks before. Now, we use floppy yarn!
"The yarn moves when you try to thread it. You have to be extra steady!"
Pincer Power
🤏
The Pinch
Use your thumb and pointer finger to pick up tiny beads.
The Anchor
Hold the yarn close to the end so it doesn't flop around!
Jewelry Recipes
Can you follow these necklace patterns?
Blue & Yellow:
A-A-B-B:
Design Time!
Start Your Necklace
Jewelry Design Planner Jewelry Planner
Plan your necklace colors before you start!
Designer Name
Date
1 My Color Palette
Choose 3 colors you want to use and color the circles:
2 My Pattern Path
Color the beads to show your pattern plan:
Designer Secret:
When you start stringing, hold the end of the yarn with your "helping hand" so your beads don't slide off!
Dot Art Slides Dot Art
Precision Placement
The Perfect Spot
Can you put your color spot exactly inside the circle?
No white edges! Stay right in the middle.
Peel and Place
The Peel
Use your fingernails to lift the edge. Be careful not to rip it!
The Press
Line it up with your eyes. Push down hard with your thumb.
Mosaic Magic
Sometimes we use glue and tiny squares .
Time to Create!
Get Your Dot Art Sheet
Rainbow Mosaic Template Rainbow Mosaic
Peel, aim, and press!
Artist Name
Date
Peel One
Aim Center
Press Hard
Use dot stickers or small paper squares with glue to fill in the rainbow.