Body Reset Teacher Guide
Teacher Facilitation Guide • Page 1
Kindergarten • Silent Regulation
Silent Body Reset: OT Guide
How to teach, cue, and safely pace the 4-step sensory movement sequence without disrupting instruction.
Why This Sequence Works (Sensory Order)
1. Slow Chair Spins (Vestibular)
Slow, rhythmic rotation (3 each way) wakes up or organizes a sluggish or restless nervous system. Always follow spinning with heavy work to anchor the body.
2. Push the Wall (Proprioceptive)
Isometric "heavy work" sends strong feedback to joints and muscles, immediately grounding the body after spinning and releasing pent-up energy silently.
3. Big Bear Squeeze (Deep Pressure)
Firm self-compression across the shoulders and arms calms the sensory system, lowers arousal, and helps children feel secure in their body.
4. Reach & Melt (Parasympathetic Exhale)
Reaching tall lengthens the torso for a deeper breath, and a slow, silent exhale activates the calming rest-and-digest response.
How to Introduce (Practice When Calm First)
- 1 Name the Goal: Tell students, "Just like our hands need soap to wash, our bodies sometimes need a quiet reset to feel steady."
- 2 Practice Silent Speed: Model what too fast looks like on the spinning chair vs. slow and steady (counting 1-2-3 silently on fingers). Emphasize zero voices and quiet feet.
- 3 Show Where to Look: Point to the wall poster and show how to tap the matching desk strip to keep track of each step independently.
Spinning Chair Safety
- • Keep it slow: Fast spinning is alerting (exciting); slow spinning is organizing.
- • 3 each way max: Spinning both directions balances the inner ear.
- • Skip if dizzy: Students sensitive to motion can skip Step 1 and start at Push the Wall, or do 5 seated chair push-ups.
Silent Classroom Cueing
- • Non-verbal prompt: Quietly tap the student's desk strip or point to the poster without speaking.
- • Whole-class reset: Use the sequence as a 60-second silent transition after recess or before carpet time.
- • Check-in: Give a silent thumbs-up when the student returns to their seat.
Teacher Facilitation Guide • Page 2
Floor-to-Chair Sequence
From Floor to Ready: How-To Notes
Step-by-step form cues for students who frequently lie down due to core fatigue or low arousal.
Why Students Lie Down (OT Lens)
Students who flop onto the floor are often experiencing core/postural fatigue or seeking full-body floor pressure. Rather than repeatedly saying "sit up," this sequence meets them on the floor, activates their shoulder and core stabilizers, and transitions them smoothly into an upright, ready-to-learn posture.
Exact Form & Teacher Cues
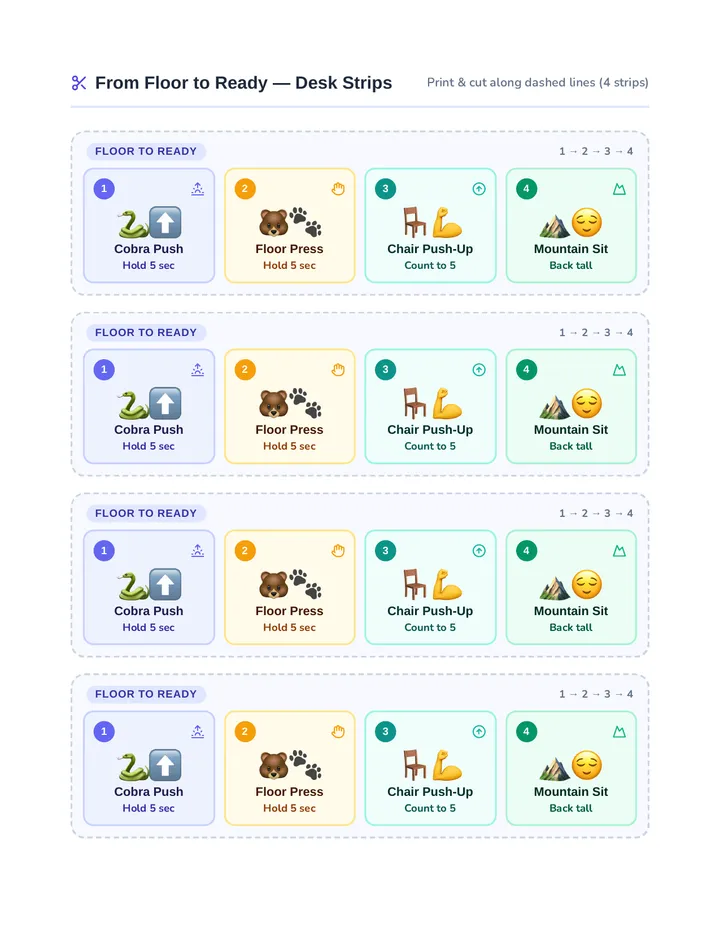
1. Belly Cobra Push (5 seconds)
What it looks like: Student lies flat on their belly with palms flat on the floor right under their shoulders and elbows tucked in. They gently push their chest up like a snake peeking up, keeping hips/legs on the floor.
Teacher Cue: "Belly heavy on the floor, lift your chest up quietly for 5."
2. Hands & Knees Floor Press (5 seconds)
How to Do the Floor Press
What it looks like: Student moves onto hands and knees in a "tabletop" position (wrists under shoulders, knees under hips, flat back). Fingers spread wide on the floor. Keeping elbows straight (not locked), they press firmly straight down into the carpet as if trying to push the floor away—activating shoulders, arms, and core without moving anywhere.
Teacher Cue: "Strong bear arms! Glue your palms flat and push the floor down for 5."
3. Chair Push-Ups (Count to 5)
What it looks like: Student sits in their chair with feet flat on the floor, grabs the left and right edges of the seat, and pushes straight down through their hands to lift their bottom 1–2 inches off the chair (or presses firmly if lifting is too hard).
Teacher Cue: "Hands on the seat—push your body up for 1-2-3-4-5, then land softly."
4. Tall Mountain Sit (1 quiet breath)
What it looks like: Feet stay flat on the floor, spine stacks tall like a mountain, shoulders drop away from ears, and student takes one quiet breath.
Teacher Cue: "Feet flat, back tall like a mountain—your core is awake!"
See Page 3 for silent Carpet-Time Variations that work right on a student's rug square without leaving the group.
Teacher Facilitation Guide • Page 3
Zero-Disruption Rug Resets
Carpet-Time Variations
Silent, in-place adaptations for both routines when students are sitting on the rug without chairs or walls.
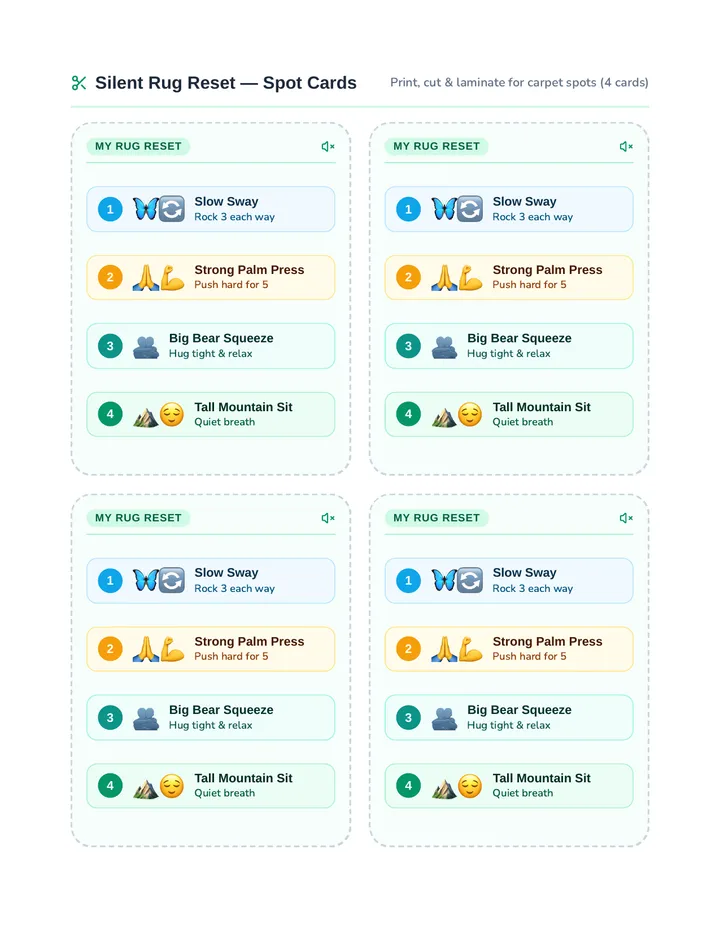
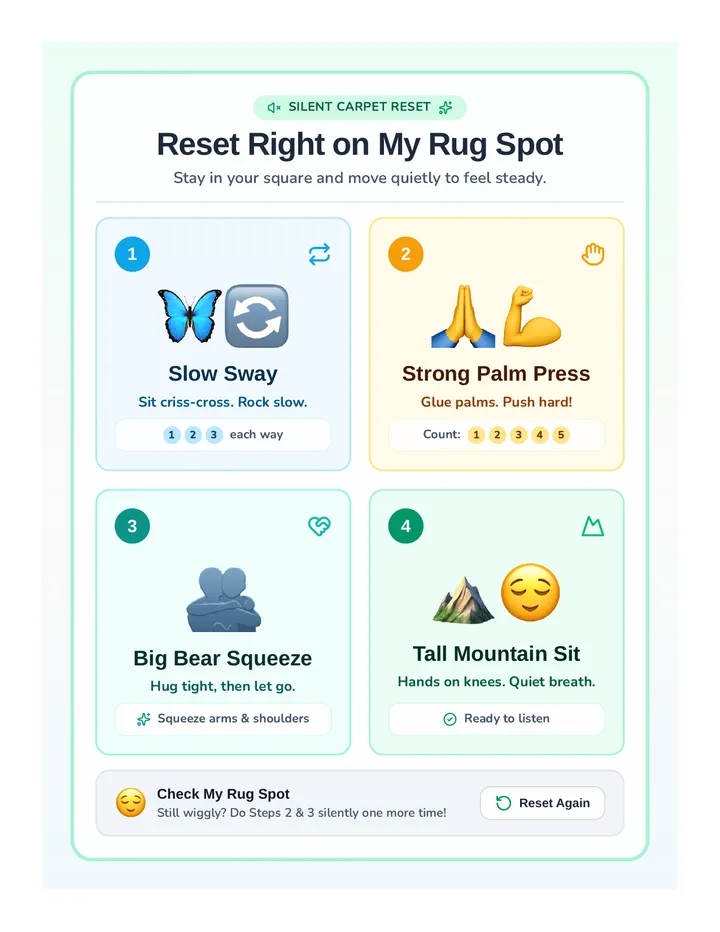
Option A: Silent Body Reset — On the Rug
1. Instead of Chair Spins → Slow Sway
Sit criss-cross, hold ankles or knees, and slowly rock side-to-side 3 times each way. Gives gentle, silent vestibular input right in their spot.
2. Instead of Wall Push → Palm Press
Press palms together firmly in front of the chest for 5 seconds ("glue your hands and push!"). Delivers silent arm/shoulder heavy work.
3. Keep: Big Bear Squeeze
Wrap arms across shoulders, squeeze tight for 3 seconds, then relax—completely silent on the rug.
4. Keep: Reach & Melt
Reach arms up quietly, then float them down to the knees with a slow, silent exhale.
Option B: From Floor to Ready — On the Rug
1. Belly Cobra (Back Edge of Rug)
Seat students who lie down often at the back edge of the rug so they can do a quiet 5-second Belly Cobra without bumping peers.
2. Keep: Hands & Knees Floor Press
Stays inside their own rug square—palms glued flat, pushing the carpet down for 5 seconds.
3. Instead of Chair → Rug Push-Up
Sit criss-cross, place palms flat on the rug beside hips, and push down for 5 seconds to lift hips slightly (or press hard into the floor).
4. Keep: Tall Mountain Sit
Sit criss-cross with spine stacked tall, hands resting on knees, ready to listen.
30-Second Whole-Class Carpet Reset (Before Read-Alouds)
Lead silently with hand signals only: Palm Press (5 sec) → Big Bear Squeeze (3 sec) → Tall Mountain Sit (1 quiet breath). Everyone's hands end resting calmly in their lap!