Perimeter Shield Guide Varsity Tactics System: 6-2 / 5-1 Defensive
Perimeter Shield Guide
Drill Sheet No. 1
Advanced Systems
Coach: ________________
Date: ________________
Focus: Left Pin Attack Coverage
Difficulty: ★★★ Varsity
Tactical Diagram: Left-Pin Shift
Perimeter Setup
Showing exact player positioning and coverage responsibilities when the opponent attacks from the left side (Position 4).
A RF MF LF LB MB RB NET BLOCK ZONE 10-FT Line Deep Line Deep Seam Sharp Angle
Front Row / Block
Back Row Perimeter
Seam Block Shadow
Drill: Three-Back Shield
Objective
Train defenders to anchor the court borders ("perimeter") and flow seamlessly around the blockers' shadow to eliminate seams.
Setup
6 defenders in base on defense side. Coach/shagger on box at left pin of opponent's court. 3 active blockers at the net.
The Loop
Coach throws/slaps ball to simulate an aggressive swing from Position 4.
Blockers (RF & MF) coordinate, close the seam, and execute a solid jump block.
Back row drops to designated perimeter points, staying outside block shadow.
LF drops off net for short tip coverage.
Progression
Start with controlled coach-tossed balls. Progress to real hitters attacking a double block from the box.
Why Perimeter?
Leaves the center of the court open, assuming blockers will seal the main angle. Forces back-row players to the boundary lines where 80% of hard-driven balls land.
Coach Checkpoints & Cues
LB
Stay Outside the Block Shadow: Must see the ball *around* the outside of the RF blocker. Do not hide.
MB
Deep Seam Anchor: Read the hands of the middle blocker. If block splits, fill the gap immediately.
LF
Tip Coverage Stance: Get low on your heels, torso forward. Be ready to sprint inside 10-ft line.
Performance Standards
Goal Success Rate 70%+ Control-to-Attack transitions
Target Target In System High-perfect dig zone%
Coach Sandbox Notes Print & Write notes during play
___________________________________________________________
___________________________________________________________
Setter Highway Guide Varsity Tactics System: Setter Transition / Target Run
Setter Highway Guide
Drill Sheet No. 2
Specialized Positions
Coach: ________________
Date: ________________
Focus: Out-of-System Decisions
Difficulty: ★★★★ Varsity
Setter Transition & Distribution
Run Phase
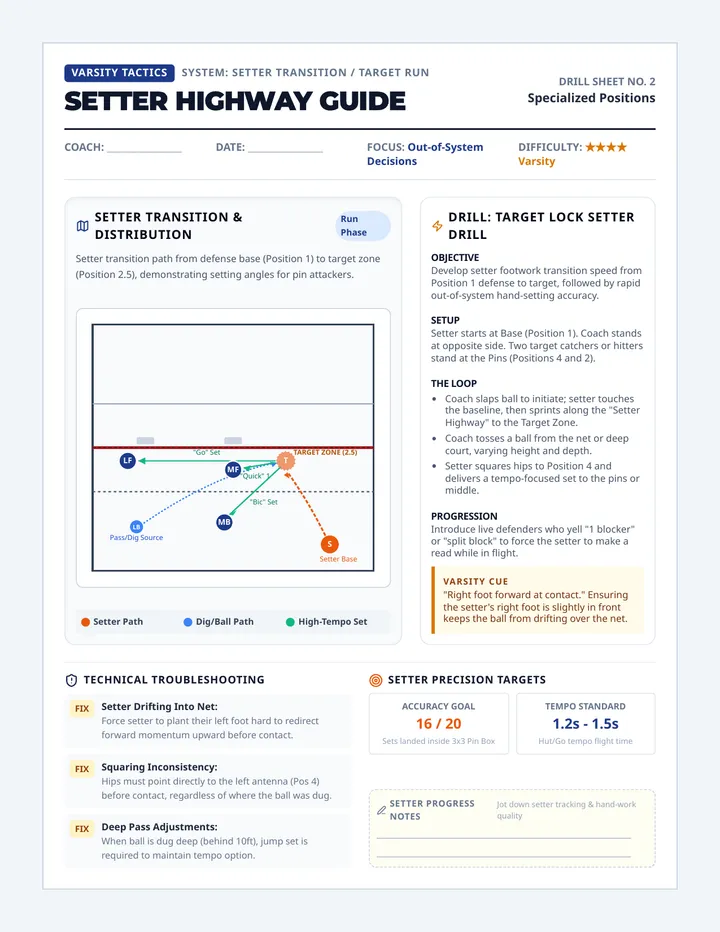
Setter transition path from defense base (Position 1) to target zone (Position 2.5), demonstrating setting angles for pin attackers.
S T LB LF MF MB TARGET ZONE (2.5) "Go" Set "Quick" 1 "Bic" Set Setter Base Pass/Dig Source
Setter Path
Dig/Ball Path
High-Tempo Set
Drill: Target Lock Setter Drill
Objective
Develop setter footwork transition speed from Position 1 defense to target, followed by rapid out-of-system hand-setting accuracy.
Setup
Setter starts at Base (Position 1). Coach stands at opposite side. Two target catchers or hitters stand at the Pins (Positions 4 and 2).
The Loop
Coach slaps ball to initiate; setter touches the baseline, then sprints along the "Setter Highway" to the Target Zone.
Coach tosses a ball from the net or deep court, varying height and depth.
Setter squares hips to Position 4 and delivers a tempo-focused set to the pins or middle.
Progression
Introduce live defenders who yell "1 blocker" or "split block" to force the setter to make a read while in flight.
Varsity Cue
"Right foot forward at contact." Ensuring the setter's right foot is slightly in front keeps the ball from drifting over the net.
Technical Troubleshooting
FIX
Setter Drifting Into Net: Force setter to plant their left foot hard to redirect forward momentum upward before contact.
FIX
Squaring Inconsistency: Hips must point directly to the left antenna (Pos 4) before contact, regardless of where the ball was dug.
FIX
Deep Pass Adjustments: When ball is dug deep (behind 10ft), jump set is required to maintain tempo option.
Setter Precision Targets
Accuracy Goal 16 / 20 Sets landed inside 3x3 Pin Box
Tempo Standard 1.2s - 1.5s Hut/Go tempo flight time
Setter Progress Notes Jot down setter tracking & hand-work quality
___________________________________________________________
___________________________________________________________
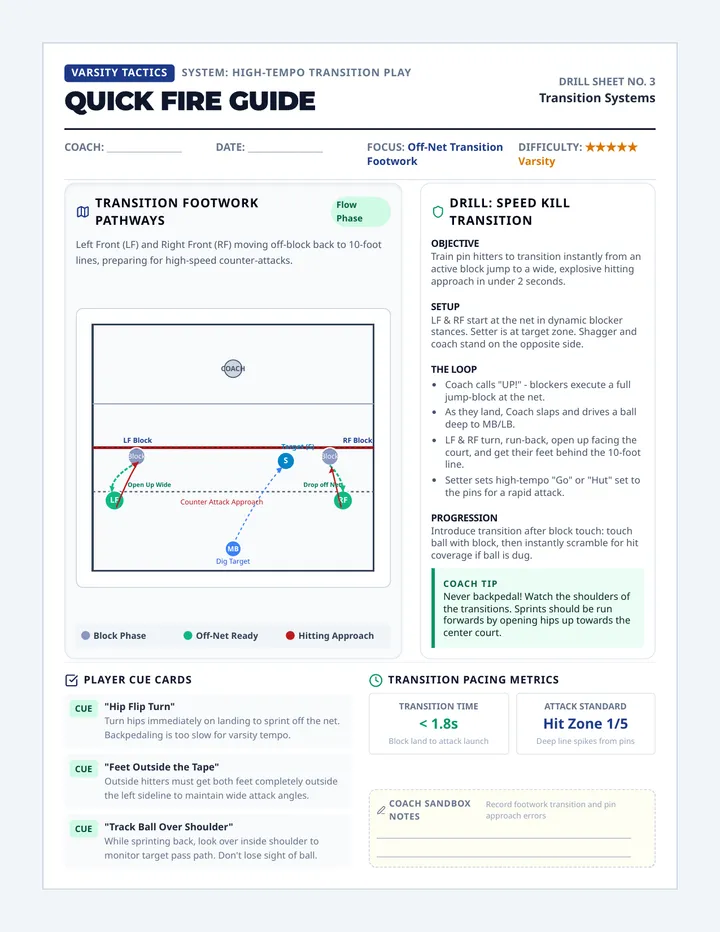
Quick Fire Guide Varsity Tactics System: High-Tempo Transition Play
Quick Fire Guide
Drill Sheet No. 3
Transition Systems
Coach: ________________
Date: ________________
Focus: Off-Net Transition Footwork
Difficulty: ★★★★★ Varsity
Transition Footwork Pathways
Flow Phase
Left Front (LF) and Right Front (RF) moving off-block back to 10-foot lines, preparing for high-speed counter-attacks.
COACH S Block LF Block RF MB LF Block RF Block Target (S) Open Up Wide Drop off Net Counter Attack Approach Dig Target
Block Phase
Off-Net Ready
Hitting Approach
Drill: Speed Kill Transition
Objective
Train pin hitters to transition instantly from an active block jump to a wide, explosive hitting approach in under 2 seconds.
Setup
LF & RF start at the net in dynamic blocker stances. Setter is at target zone. Shagger and coach stand on the opposite side.
The Loop
Coach calls "UP!" - blockers execute a full jump-block at the net.
As they land, Coach slaps and drives a ball deep to MB/LB.
LF & RF turn, run-back, open up facing the court, and get their feet behind the 10-foot line.
Setter sets high-tempo "Go" or "Hut" set to the pins for a rapid attack.
Progression
Introduce transition after block touch: touch ball with block, then instantly scramble for hit coverage if ball is dug.
Coach Tip
Never backpedal! Watch the shoulders of the transitions. Sprints should be run forwards by opening hips up towards the center court.
Player Cue Cards
CUE
"Hip Flip Turn" Turn hips immediately on landing to sprint off the net. Backpedaling is too slow for varsity tempo.
CUE
"Feet Outside the Tape" Outside hitters must get both feet completely outside the left sideline to maintain wide attack angles.
CUE
"Track Ball Over Shoulder" While sprinting back, look over inside shoulder to monitor target pass path. Don't lose sight of ball.
Transition Pacing Metrics
Transition Time < 1.8s Block land to attack launch
Attack Standard Hit Zone 1/5 Deep line spikes from pins
Coach Sandbox Notes Record footwork transition and pin approach errors
___________________________________________________________
___________________________________________________________