Reverse Stance Lesson Plan Day 1 of 4 • Instructor Guide
Reverse Stance & Balance
Unit: Reverse Gliders • Duration: 45–50 Mins • Setting: Ice Arena
Safety Priority
Knee flexion & chin-tuck fall
Core Learning Objectives
Demonstrate reverse athletic stance: knees soft over toes, chest up, weight mid-blade to ball.
Execute controlled "fall-and-recover" drill without reaching backwards with wrists.
Initiate backward drift from stationary stance using alternating hip wiggles.
Equipment
• Cones (12 for zone setup)
• Arena barrier wall access
• Student cue cards & clipboards
Lesson Schedule & Flow
Time
Segment
Instructional Focus & Teacher Cues
00–08m
Warm-up & Stance Check
Off-ice dry run: "Belly over boots, hands on table." Transfer to ice along boards. Test forward-to-backward head turns without twisting shoulders.
08–18m
Safe Fall & Stand Clinic
Knee slide practice: skaters sink hips, slide hands along thighs, land on side of hip/thigh, avoid stiff arm lockout. Practice standing using the two-foot pivot recovery.
18–35m
Backward Wiggle Stations
Wall push-offs into reverse glide; hip sway drill ("snake wiggles") maintaining parallel blades. Rotate through mixed-ability station paths (see below).
35–45m
Cool-down & Self-Check
Free slow glide, partner posture check using the Day 1 Card, group debrief on weight placement (avoiding the toe pick or rocker kick).
Adaptations for Mixed Ability Levels
Tier 1: Emerging / Hesitant
Stay within 1 arm-length of perimeter boards. Two-hand wall push-off with stationary backward glide to cone (3m). Focus: maintaining ankle flexion without sitting backward.
Tier 2: Developing / Steady
Wall-free zone. One push-off into continuous 6-meter reverse snake wiggle. Eyes level, alternating side hip shifts to sustain backward glide momentum.
Tier 3: Confident / Advanced
Stationary start (no wall assist). Initiate wiggles directly from zero momentum. Add shoulder glance over left and right shoulders alternately every 3 seconds.
Golden Verbal Cues
• "Nose over knees, knees over toes": Prevents leaning back onto blade tails.
• "Hold the lunch tray": Arms bent in front at waist level for stability.
• "Soft ankles, heavy soles": Ground weight through blade center.
Common Faults & Corrections
• Looking down at boots: Arches the spine and triggers falling backward. Cue eyes forward.
• Straight locking knees: Absorbs no shocks. Cue "springy sponge knees".
• Catching toe picks (figure skates): Skater is leaning forward onto balls of feet.
Reverse Gliders Unit • Instructor Guide 1 Ensure all skaters wear ASTM/CSA ice helmets & gloves
Reverse Stance Student Card Student Practice Sheet • Day 1
Reverse Stance & Balance Guide
Master the reverse athletic posture and first backward glides.
Name:
Date:
The 4 Checkpoints of Reverse Balance
1
Eyes & Chin
Eyes up at rink boards. Chin lifted. Never look straight down at toes.
2
Hands & Arms
Both hands out front like resting on an invisible tabletop. Elbows bent.
3
Knees & Hips
Deep knee bend over ankles. Hips sink slightly as if sitting on a high stool.
4
Blades & Weight
Weight balanced over the flat middle blade. Keep skates shoulder-width.
Safe Falling Golden Rule: "Sink & Slide"
If you feel off-balance going backwards: 1) Bend knees deeper immediately to lower your center of gravity. 2) Slide hands forward onto knees or thighs—do NOT reach hands behind you to catch the ice. 3) Land softly on your padded hip/thigh.
Daily Practice Drills (Choose Your Challenge Level)
Drill Target
Execution Goal
Trial 1 & 2
Mastered
1. Safe Drop & Stand
Drop to knees smoothly, hands in front, stand up using one knee pivot without slipping.
2. Wall Push Glide
Tier 1: 5-foot backward glide holding boards.
Tier 2/3: 12-foot free reverse glide in steady stance.
3. Reverse Wiggle
Shift hips side-to-side while moving backward. Skates stay on ice in parallel tracks.
Goal: 4 continuous wiggles without stopping.
Partner & Self Check
Partner Observation:
Did your partner keep their hands forward and knees bent while drifting back?
Always forward Dropped once or twice
Partner Initials:
My Day 1 Takeaway:
One thing I noticed about where my blade weight was balanced:
Reverse Gliders Unit • Day 1 Student Practice Keep knees springy • Look where you are traveling
Bubble Power Lesson Plan Day 2 of 4 • Instructor Guide
Bubble Power (Backward Swizzles)
Unit: Reverse Gliders • Duration: 45–50 Mins • Setting: Ice Arena
Mechanical Focus
Inside-edge push & knee pump
Day 2 Objectives
Form the reverse lemon shape: start toes slightly in, push heels out, draw heels together.
Coordinate the vertical knee pump: sink low on the push out, rise slightly as blades draw in.
Maintain continuous backward momentum across at least 8–10 meters without turning forward.
Arena Setup
• Paint or chalk lines (optional lemon paths)
• Cones along blue-line corridor
• Student Day 2 progression sheets
Lesson Schedule & Flow
Time
Segment
Instructional Strategy & Activity
00–07m
Dynamic Warm-up
Stationary ankle flexes, forward-to-backward stance review at boards, and two controlled safe-drop recoveries to reinforce Day 1 muscle memory.
07–18m
The "Lemon Mechanics"
Instructor breakdown on clean ice: 1) "Pigeon toes" start, 2) Carve outward on inside edges while bending knees, 3) Pull heels together while rising. Practice off the wall with hands resting on handrail.
18–35m
Tiered Progression Lanes
Divide ice into 3 marked lanes (Station 1: Wall Swizzle Flow, Station 2: Free 3-Bubble Corridor, Station 3: Continuous Speed Swizzles). Rotate coach feedback every 5 minutes.
35–45m
Partner Count & Debrief
Skaters pair up to count consecutive clean swizzles on Day 2 Progression Ladder. Class group debrief on keeping toes from scraping.
Tiered Instructional Adaptations
Tier 1: Foundation (Hesitant)
Board-assist: Start facing boards, push backward into 1 swizzle, grab boards again. Progress to "Half-Lemons" (one foot pushes out/in while other foot glides straight).
Tier 2: Intermediate (Flowing)
Free ice 4-swizzle chain across blue lines. Focus on symmetry: both feet carve equal widths without one dominant leg steering sideways.
Tier 3: Advanced (Power & Edge)
Wide deep-sink swizzles (shoulder-width-and-a-half). Add transition into a 2-second two-foot backward glide between each swizzle, checking head turn over shoulder.
Key Coaching Phrases
• "Toes kiss, heels push, heels kiss": The footprint path on the ice.
• "Sink to open, stand to close": Connects knee depth to edge power.
• "Keep your feet on the floor": Never kick feet off ice during recovery.
Common Traps to Correct
• Feet getting stuck wide: Skater failed to rise and angle toes inward. Have them bend deeper before pulling.
• Blade chatter or scratching: Pushing off the toe pick instead of the blade center.
• Chest collapsing forward: Cue "keep your proud chest and open shoulders."
Reverse Gliders Unit • Instructor Guide 2 Backward Swizzles develop the edge sensitivity for all advanced reverse skating
Bubble Power Progression Ladder Student Practice Sheet • Day 2
Bubble Power Progression Ladder
Master backward swizzles and continuous lemon carves on ice.
Name:
Date:
The Backward Lemon Blueprint
Phase 1: Start (Toes In)
Toes turned slightly inward (pigeon-toed). Knees springy, hands forward.
Phase 2: Push Out (Sink)
Press down through inside edges. Push heels wide while bending knees deeply.
Phase 3: Pull In (Rise)
Turn toes inward and squeeze heels together while rising back to tall stance.
The 4-Step Swizzle Progression Ladder
Rung
Skill Stage
Challenge Criteria
Attempts
Sign-Off
1
Half-Lemon Carve
Keep one foot gliding straight while pushing the other foot out and back in. Repeat on both sides.
2
Single Full Bubble
Both skates carve out symmetrically and come back together without losing balance or catching toe picks.
3
Triple Bubble Chain
Execute 3 fluid backward swizzles connected in a smooth rhythm across the blue line zone.
4
Power Swizzle Cruiser
6 continuous powerful swizzles across the rink width, looking over right and left shoulder in turn.
Performance Checks & Reflection
Knee Rhythm Check:
Did your knees clearly bend on the push out and rise slightly on the pull in?
Yes, smooth up-and-down pump Legs stayed mostly stiff / locked
Coach / Partner Note:
Skater Reflection:
What felt easier today compared to Day 1, and what is your goal for Day 3?
Reverse Gliders Unit • Day 2 Student Practice Sink to open • Stand to close
Edge Carvers Lesson Plan Day 3 of 4 • Instructor Guide
Edge Carvers (Backward C-Cuts)
Unit: Reverse Gliders • Duration: 45–50 Mins • Setting: Ice Arena
Skill Progression
Single-leg push to glide transfer
Day 3 Objectives
Isolate the working skate into a crisp semi-circular "C" cut using the inside edge.
Maintain steady center of mass over the glide skate without wobbling or tilting.
Coordinate alternating pushes (Right C-Cut → Glide → Left C-Cut → Glide) with fluid rhythm.
Equipment
• 16–20 low marker cones
• Pylon slalom corridors
• Day 3 Drill Tracker sheets
Lesson Schedule & Flow
Time
Segment
Key Teaching Prompts & Drill Setup
00–08m
Warm-up & Swizzle Flow
Three full lengths of backward swizzles. Focus on deep knee bend and waking up inside edges. Check head turns looking over alternate shoulders.
08–20m
The Anatomy of a C-Cut
Break down the movement: 70% bodyweight stays on gliding skate. The working blade cuts a letter "C" on ice—heel leads out, toe finishes inward. Practice one leg at a time along boards.
20–35m
Slalom & Alternating Lanes
Set up 3 lanes with spaced cones. Skaters practice alternating C-cuts: Right C → 2-sec glide → Left C → 2-sec glide. Challenge skaters to weave gently around cones.
35–45m
Partner Edge Evaluation
Pairs evaluate clean blade returns (does the carving skate snap cleanly back parallel, or drag?). Complete Day 3 Tracker sign-offs.
Tiered Instructional Adaptations
Tier 1: Developing Balance
One hand light touch on boards. Execute 4 consecutive C-cuts with the outer foot while the inner foot glides straight. Switch directions and repeat on opposite foot.
Tier 2: Controlled Alternation
Free ice alternating C-cuts. Count a 2-second glide between each cut. Keep blades on the ice throughout (no lifting or stomping the pushing foot).
Tier 3: Power & Single-Leg Glide
Deep, dynamic C-cuts that accelerate the skater. Lift the carving foot 1 inch off ice after completing the C-cut into a 3-second single-foot backward glide.
Coaching Directives
• "Heavy glide knee, light carving foot": Anchor your center over the straight skate.
• "Carve the letter C in the ice": Heel curves out, toe hooks back in.
• "Blades return to parallel tracks": Bring feet together between pushes.
Watchouts & Faults
• Lifting the push foot high: Skater loses balance. Remind them: blades stay close to ice.
• Pushing straight back instead of in an arc: Results in toe pick kick with no propulsion.
• Swiveling upper body wildly: Shoulders must remain stable and square.
Reverse Gliders Unit • Instructor Guide 3 C-Cuts build the single-leg independence required for backward crossovers and hockey strides
Edge Carvers Drill Tracker Student Practice Sheet • Day 3
Edge Carvers Drill Tracker
Master single-leg backward C-cuts, edge bite, and alternating rhythm.
Name:
Date:
The C-Cut Footwork Anatomy
1. The Glide Skate
Supports 70% of your bodyweight. Remains pointed straight backward on a flat blade.
2. The Carve Arc
The working foot cuts out in a curved arc using the inside edge. Heel leads outward, toe finishes inward.
3. The Snap Return
The carving foot snaps cleanly back parallel next to the glide skate to prepare for the opposite foot.
Day 3 Skill Drills (Select Your Level)
Drill Target
Execution Standards
Set 1 & 2
Passed
1. Single-Leg Isolation
Perform 4 consecutive C-cuts on Right foot only, then 4 on Left foot only. Glide foot stays on a straight line.
2. Alternating Cadence
R-cut → 2-sec two-foot glide → L-cut → 2-sec glide. Maintain forward gaze and steady shoulder line across neutral zone.
3. Slalom Navigation
Tier 1/2: Weave between 4 cones with alternating C-cuts.
Tier 3: Tight cone weave with single-foot glide extension after each cut.
Peer Coaching Observation
Look at Your Partner's Skates:
Did the pushing skate stay on ice during the entire "C" arc? Did both feet return parallel between every push? Did they look over their shoulder before initiating backward flow?
Observer's Name:
Personal Edge Notes:
Which foot carved the sharper C (Right or Left)? How can you strengthen your weaker edge?
Reverse Gliders Unit • Day 3 Student Practice Smooth rhythm beats fast rushed pushes every time
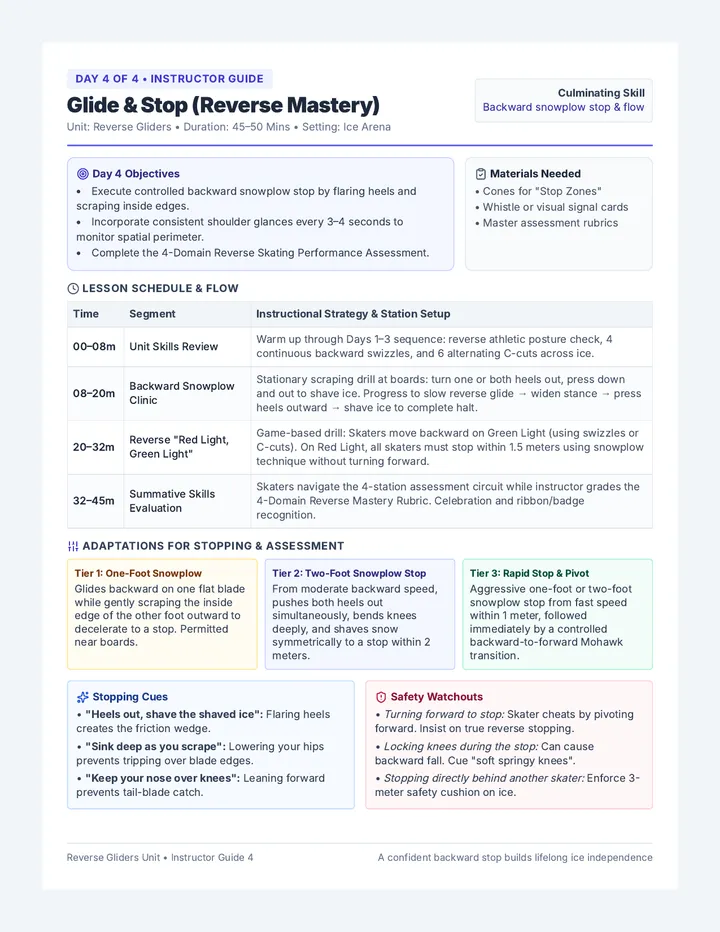
Glide Stop Lesson Plan Day 4 of 4 • Instructor Guide
Glide & Stop (Reverse Mastery)
Unit: Reverse Gliders • Duration: 45–50 Mins • Setting: Ice Arena
Culminating Skill
Backward snowplow stop & flow
Day 4 Objectives
Execute controlled backward snowplow stop by flaring heels and scraping inside edges.
Incorporate consistent shoulder glances every 3–4 seconds to monitor spatial perimeter.
Complete the 4-Domain Reverse Skating Performance Assessment.
Materials Needed
• Cones for "Stop Zones"
• Whistle or visual signal cards
• Master assessment rubrics
Lesson Schedule & Flow
Time
Segment
Instructional Strategy & Station Setup
00–08m
Unit Skills Review
Warm up through Days 1–3 sequence: reverse athletic posture check, 4 continuous backward swizzles, and 6 alternating C-cuts across ice.
08–20m
Backward Snowplow Clinic
Stationary scraping drill at boards: turn one or both heels out, press down and out to shave ice. Progress to slow reverse glide → widen stance → press heels outward → shave ice to complete halt.
20–32m
Reverse "Red Light, Green Light"
Game-based drill: Skaters move backward on Green Light (using swizzles or C-cuts). On Red Light, all skaters must stop within 1.5 meters using snowplow technique without turning forward.
32–45m
Summative Skills Evaluation
Skaters navigate the 4-station assessment circuit while instructor grades the 4-Domain Reverse Mastery Rubric. Celebration and ribbon/badge recognition.
Adaptations for Stopping & Assessment
Tier 1: One-Foot Snowplow
Glides backward on one flat blade while gently scraping the inside edge of the other foot outward to decelerate to a stop. Permitted near boards.
Tier 2: Two-Foot Snowplow Stop
From moderate backward speed, pushes both heels out simultaneously, bends knees deeply, and shaves snow symmetrically to a stop within 2 meters.
Tier 3: Rapid Stop & Pivot
Aggressive one-foot or two-foot snowplow stop from fast speed within 1 meter, followed immediately by a controlled backward-to-forward Mohawk transition.
Stopping Cues
• "Heels out, shave the shaved ice": Flaring heels creates the friction wedge.
• "Sink deep as you scrape": Lowering your hips prevents tripping over blade edges.
• "Keep your nose over knees": Leaning forward prevents tail-blade catch.
Safety Watchouts
• Turning forward to stop: Skater cheats by pivoting forward. Insist on true reverse stopping.
• Locking knees during the stop: Can cause backward fall. Cue "soft springy knees".
• Stopping directly behind another skater: Enforce 3-meter safety cushion on ice.
Reverse Gliders Unit • Instructor Guide 4 A confident backward stop builds lifelong ice independence
Reverse Mastery Skills Rubric Summative Unit Assessment • Day 4
Reverse Mastery Skills Rubric
Unit: Reverse Gliders • Comprehensive 4-Day Ice Skating Evaluation
Skater:
Evaluator:
Domain
Level 1: Emerging
Level 2: Developing
Level 3: Proficient
Level 4: Advanced
Score
1. Reverse Posture & Safety
Relies on barrier wall; looks down at skates; stands upright with stiff knees.
Maintains bent knees on open ice; arms occasionally drop; recovers safely from falls.
Consistent athletic reverse stance; chin up; hands held stable in front; smooth safe-fall drop.
Dynamic low center of gravity; effortless head checks over both shoulders with zero torso twist.
2. Backward Swizzles (Bubbles)
Requires wall push; produces shallow half-lemons; toe picks occasionally scrape.
Completes 2–3 connected swizzles on free ice; minor asymmetry between feet.
Symmetrical 4+ continuous swizzles; clear sink-to-open and rise-to-close knee pump.
Deep, powerful multi-meter swizzles; accelerates backward with high speed and crisp edge bite.
3. Alternating C-Cuts
Executes C-cut on dominant foot only with board support; free foot wobbles.
Alternates right and left C-cuts; slight hesitation or foot stomp during blade return.
Fluid alternating rhythm; clean inside-edge carve; straight gliding foot; parallel return.
Powerful single-leg push into 3-second one-foot glide; smoothly carves cone slalom course.
4. Backward Snowplow Stop
Turns forward to stop, or grabs barrier boards to halt momentum.
Executes one-foot or gentle two-foot scrape stop from slow speed within 3 meters.
Controlled two-foot snowplow stop from moderate speed within 1.5–2 meters; shaves snow cleanly.
Instant deceleration from high speed within 1 meter; immediate transition or defensive ready stance.
Scoring Key & Achievement Badges:
4–7 Pts Frost Badge
Emerging reverse skater
8–12 Pts Glider Badge
Independent reverse skater
13–16 Pts Master Blade Badge
Power & precision carver
Total Composite Score:
/16
Earned Points
Date Certified:
Coach Evaluator Feedback:
Skater Goal for Next Session:
Reverse Gliders Unit • Culminating Skills Assessment Evaluated according to standard recreational & foundational ice sports guidelines