Magic Windows Presentation Magic Windows
Digital Art Explorers
Our Magic Windows
A tablet is like a magic window. It can catch a moment and keep it forever!
"Let's use our tablets to catch a picture of our favorite toy!"
The Two-Hand Hold
Hold it steady!
Use two hands!
Keep those hands away from the lens!
Center Stage!
Subject in the middle
Don't cut off heads!
Don't cut off feet!
Photo Hunter Challenge
1 Find your favorite toy or classroom object.
2 Hold your tablet with TWO HANDS .
3 Put your toy right in the MIDDLE of the screen.
4 CLICK! Take a clear, steady photo.
Photo Hunter Checklist Photo Hunter
Can you catch them all?
Name: __________________________
Date: ___________________________
Mission: Take 4 photos. Make sure your subject is in the middle and stays steady!
A Toy
Caught it!
Something Red
Caught it!
A Friend
Caught it!
A Book
Caught it!
Did you use TWO HANDS ?
Is it in the MIDDLE ?
Capture Captain Teacher Guide Capture Captain
Teacher Facilitation Guide
Lesson 1 of 5
Framing & Capture
Objective
Students will demonstrate proper tablet handling (two-hand hold) and basic photographic composition by centering a subject in their digital frame without cropping vital elements (heads/feet).
Preparation
Ensure all tablets are charged and the camera app is easily accessible.
Set up a "Gallery Space" on a shared drive or physical board for later viewing.
Have a few sample toys/objects ready for modeling.
Materials
Tablets (1 per student)
Magic Windows Slides
Photo Hunter Checklist
Key Terms
Composition, Framing, Subject, Steady
Instructional Flow
1
The Hook (5 mins)
Gather students and explain that today they are "Digital Explorers." Show them a tablet and call it a "Magic Window." Ask: "If you could catch a tiny bit of the world and put it in your pocket, what would you catch?"
2
Direct Instruction (10 mins)
Use the Magic Windows Presentation . Demonstrate the "Two-Hand Hold." Purposefully take a bad photo (too shaky, or cutting off a toy's "head"). Ask students to help you fix it. Model placing the subject in the center crosshairs.
3
Photo Hunt (20 mins)
Hand out the Photo Hunter Checklist . Students move around the room to find and photograph the 4 items. Circulate to check for tablet safety and framing. Encourage them to "Freeze like a statue" before clicking.
4
Reflection (5 mins)
Have students share their favorite "Catch" with a partner. Ask: "Which photo was the hardest to keep steady?"
Differentiation & Support
For Support
Allow students to sit or rest their elbows on a table to stabilize their tablet. Provide a physical "frame" (like a paper cut-out) to practice framing without the digital device first.
For Extension
Challenge students to take "Mystery Photos"—zooming in so much on a familiar object that it's hard to tell what it is, then having a friend guess!
Zoom Zoom Presentation Zoom Zoom!
Getting Closer to Art
The Magic Trick
Whole Bus
Just the Tire!
"Can you take a picture of a whole car and then turn it into a picture of just a tire?"
What is Cropping?
Too much stuff!
Snip the extra away!
Cropping is like using magic scissors to cut away the parts we don't need.
How to Zoom
Pinch Out
Put two fingers on the screen and pull them apart!
Crop Button
Look for the "Square" button to trim your photo.
Zoom Zoom Challenge!
1 Take a photo of a friend's WHOLE FACE .
2 Use the CROP tool.
3 Zoom in until you only see their EYE .
4 Show a neighbor your mystery photo!
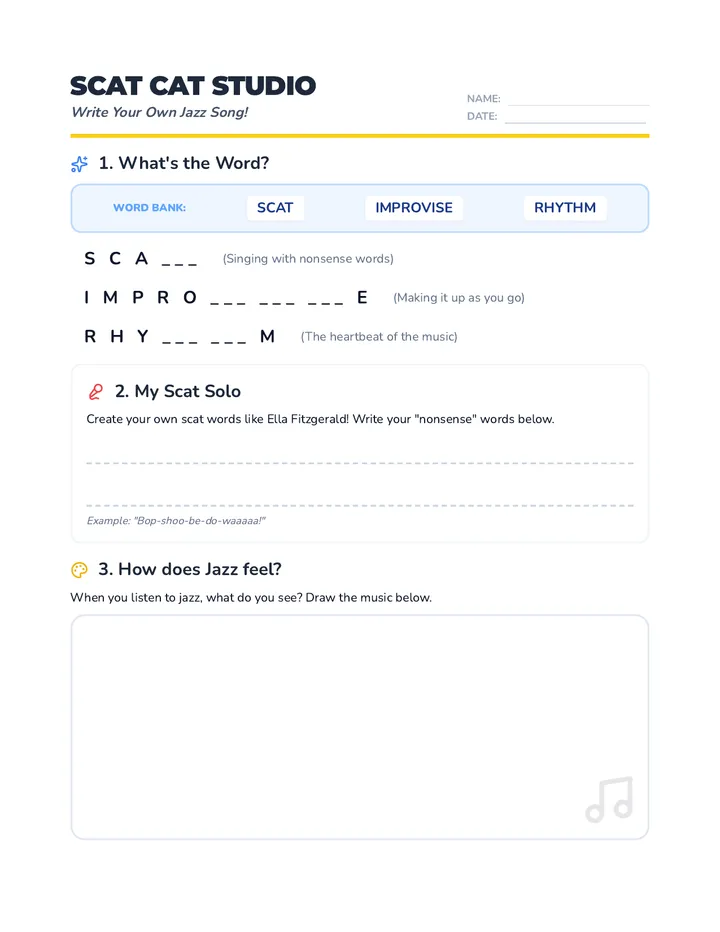
Zoom Zoom Practice Sheet Zoom Zoom Practice
Finding the Tiny Details
Explorer: ______________________
Date: _______________________
Part 1: Mystery Match
Draw a line from the "Whole" picture to the "Zoomed In" picture!
Apple
Sun
Flower
ZOOM: RAY
ZOOM: STEM
ZOOM: PETAL
Part 2: Your Turn
Go find a pattern in the room. Zoom in until it looks like a mystery!
Glue your printed photo here!
What did you zoom in on?
Focus Finder Teacher Guide Focus Finder
Teacher Facilitation Guide
Lesson 2 of 5
Cropping & Zooming
Objective
Students will use digital editing tools (crop/zoom) to remove distracting background elements and emphasize a specific detail within a photograph.
Preparation
Prepare a few "mystery" images for the hook (highly zoomed-in photos of common objects).
Check that the tablet's native "Edit" function is unlocked for students.
Materials
Tablets
Zoom Zoom Slides
Zoom Practice Sheet
Key Terms
Zoom, Crop, Detail, Background
Instructional Flow
1
Mystery Eye (5 mins)
Show the students a highly zoomed-in photo of an eye. Ask: "What is this?" Then zoom out to reveal the whole face. Explain: "Sometimes, one small part of a photo is the most interesting part!"
2
The Scissors Tool (10 mins)
Use Zoom Zoom Slides . Demonstrate the "Pinch" gesture on a tablet. Show them the "Crop" icon (the overlapping squares). Emphasize that cropping is like "trimming away the mess."
3
Mystery Hunt (20 mins)
Students take a photo of a large object (like a car or the playground) then use the crop tool to focus on a tiny detail (a bolt, a flower, a leaf). They then use the Practice Sheet to glue their printed mystery photo and name it.
4
Sharing (5 mins)
Hold up the practice sheets and have the class guess what the "mystery details" are before the creator reveals the answer.
Discussion Prompts
"Why would we want to cut part of our photo away?"
To focus on the subject
"What happens to the photo when we zoom in very far?"
It gets blurry/grainy (Introduction to Pixels)
Scribble Stories Presentation Scribble Stories
Making the Real World Magic
What if...
What if a dragon landed on your desk?
Let's draw it!
Mixed Media
Digital Photo
The REAL world
Digital Drawing
The MAGIC world
+ Together they make a NEW Story!
Your Magic Tools
Pick Colors
Draw Lines
Magic Eraser
Magic Hands Challenge
1 Take a photo of your HAND on the table.
2 Open the DRAW tool.
3 Draw something TINY living in your hand!
4 Add SPARKLES or stars around it.
Magic Hands Prompt Magic Hands
Drawing on Your Reality
Artist: ______________________
Date: _______________________
What is in your hand?
Take a photo of your hand. Use your MAGIC TOOLS to draw a tiny world inside it. Is it a pet? A tiny house? A shooting star?
1. My Plan
Sketch your idea here first:
2. My Masterpiece
Glue your printed photo here!
REAL + MAGIC
Tell the story of your photo:
Dream Weaver Teacher Guide Dream Weaver
Teacher Facilitation Guide
Lesson 3 of 5
Drawing on Reality
Objective
Students will combine digital photography with digital drawing tools to create a mixed-media artwork that expresses an imaginative idea based on a real-world object (their hand).
Preparation
Test the "Markup" or "Drawing" tool in the tablet's photo editor to ensure it allows for different colors and brush sizes.
Prepare a "Gallery" slide to display student hand-photos once they are finished.
Materials
Tablets
Scribble Stories Slides
Magic Hands Prompt
Key Terms
Mixed Media, Imaginative, Digital Tool, Layers
Instructional Flow
1
The Invisible Friend (5 mins)
Place your hand on a table and pretend there is a tiny, invisible creature sitting in it. Talk to it. Then ask: "How can I show you what my invisible friend looks like? We can't take a photo of something imaginary... or can we?"
2
Reality Meets Magic (10 mins)
Use Scribble Stories Slides . Show how to take a photo of a hand first. Then, demonstrate opening the drawing tool. Draw a simple creature (a blob with eyes) in your hand. Explain that the photo is REAL and the drawing is MAGIC.
3
Creation Station (20 mins)
Students take their own hand photos. Hand out the Magic Hands Prompt . Students sketch their idea on paper first (scaffolding the digital work) and then use the tablets to create. Circulate to help with tool switching.
4
Storytelling (5 mins)
Students share their "Magic Hand" with a partner and tell a 1-sentence story about who or what is living in their hand.
Teacher Tips & Troubleshooting
Brush Size
Kindergarteners often draw very thick lines. Encourage them to try the "skinny pencil" tool for smaller details like eyes or wings.
Saving Work
Remind students to click "Done" or the "Save" icon. They often close the app without saving their magic drawings!
Filter Fun Presentation Filter Fun
Changing the Mood of Art
Magic Glasses
A FILTER is like putting on magic glasses that change how everything looks!
"How can we make a photo taken today look like it was taken 100 years ago?"
How does it feel?
B & W
Serious, Old, Quiet
Vivid
Happy, Bright, Loud
The Magic Buttons
Look for the circles!
Tap the circles to cycle through your magic glasses. Try them all!
Filter Match-up
1 Take a photo of a YELLOW toy.
2 Find the B&W filter. What happened to the yellow?
3 Find a BRIGHT filter. Does the toy look more happy?
4 Save your favorite mood!
Mood Matcher Worksheet Mood Matcher
How does your photo feel?
Digital Artist: ___________________
Date: ______________________
Part 1: Match the Mood
Draw a line from the filter to the word that matches!
FILTER A
FILTER B
FILTER C
SAD / COOL
OLD / QUIET
HAPPY / LOUD
Part 2: My Favorite Mood
Glue two photos of the SAME object here. One normal, and one with a filter!
NORMAL PHOTO
Plain and simple
FILTERED PHOTO
Magical and Moody
Filter Friend Teacher Guide Filter Friend
Teacher Facilitation Guide
Lesson 4 of 5
Filters & Feelings
Objective
Students will explore and apply digital photo filters to identify how color and contrast changes can evoke different moods or atmospheric qualities in an image.
Preparation
Prepare a "Mood Wall" (digital or physical) with categories like "Happy/Bright," "Sad/Cool," and "Old-Fashioned."
Identify the specific "Filter" icon in your tablet's software (often three overlapping circles).
Materials
Tablets
Filter Fun Slides
Mood Matcher Worksheet
Key Terms
Filter, Contrast, Mood, Sepia
Instructional Flow
1
Magic Glasses (5 mins)
Bring a few pairs of colored sunglasses or translucent colored filters. Let students look through them. Ask: "How does the room feel when it's all BLUE? How does it feel when it's all RED?"
2
The Filter Button (10 mins)
Use Filter Fun Slides . Show the class where the filter button is on the tablet. Model taking one photo and cycling through 5 different filters. Ask students to shout out the mood for each one (e.g., "Sad!" "Happy!" "Spooky!").
3
Mood Matching (20 mins)
Students complete Part 1 of the Mood Matcher Worksheet as a class or in small groups. Then, they go on a "Mood Hunt"—taking a photo of an object and finding a filter that changes its feeling. They complete Part 2 of the worksheet.
4
The Mood Wall (5 mins)
Display the student photos. Have students walk around and see if they can guess the mood of their friends' filtered photos.
Teacher Insight
"For many Kindergarteners, this is their first introduction to Visual Analysis —the idea that what we see impacts how we feel. Focus less on the technical names (like 'Sepia') and more on the emotional connection ('Old/Dusty')."
Surreal Scenes Presentation Impossible!
Digital Collage Adventures
Wait... What?
Can a pencil be bigger than a chair? Can a shoe fly in the sky?
In digital art, EVERYTHING is possible!
COLLAGE
Mixing it Up
Photo 1
Photo 2
COLLAGE!
A collage is when we take pieces of different photos and glue them together!
Giant or Tiny?
MAKE IT GIANT!
MAKE IT TINY!
Use your fingers to pinch things bigger or smaller.
The Impossible World
1 Take 3 photos of objects in the room.
2 Put them all on ONE page.
3 Make one object GIGANTIC .
4 Add drawings to finish your impossible world!
Impossible World Project Guide Impossible World
My Surreal Masterpiece
Digital Explorer: _________________
Date: ____________________
The Final Mission
Take photos of 3 things. Put them together to make a world that is impossible in real life!
Photo 1
Photo 2
Photo 3
My Impossible World
Glue your final collage here
Art Gallery Space
I used filters
I added drawings
It is IMPOSSIBLE!
Master Mixer Teacher Guide Master Mixer
Teacher Facilitation Guide
Lesson 5 of 5
Impossible Photo Collage
Objective
Students will synthesize skills from previous lessons (framing, cropping, filtering, and drawing) to create a digital collage that depicts a surreal, impossible scene.
Preparation
Set up a digital collage app (e.g., PicCollage Kids, Canva, or the native tablet "Layout" tool).
Prepare a "Surrealist Gallery" digital space to host the final projects.
Materials
Tablets
Surreal Scenes Slides
Project Guide
Key Terms
Collage, Surreal, Scale, Combine
Instructional Flow
1
The Upside Down (5 mins)
Show a photo of something "impossible" (e.g., a fish swimming in the sky). Ask: "Is this real?" When they say no, ask: "But how did I take a photo of it?" Explain that we are going to use our "Digital Magic" to mix reality together.
2
The Mixer (10 mins)
Use Surreal Scenes Slides . Demonstrate opening the collage tool and importing two different photos. Show how to make one object GIGANTIC by using two fingers to stretch it. Place a tiny pencil next to a giant shoe.
3
Impossible World Creation (25 mins)
Students find 3 objects in the room and photograph them. They use the Project Guide to plan which object will be the giant. Then, they use the tablets to mix their photos. Remind them they can also draw on top of their collage for extra magic!
4
Art Gala (10 mins)
Display the final collages. Have a "Gallery Walk" where students walk around and point out the most "impossible" things they see.
What to Look For
Skill Check
• Subject is clear and framed well.
• At least 2 photos are combined.
• One object has been resized (scale).
Creativity Check
• The scene is truly "impossible."
• Used filters or drawing to enhance mood.